Tesla Model S: Assembly - Cover - Footwell - RH (RHD) (Remove and Replace)
Tesla Model S (2012-2026) Service Manual / Instrument Panels and Pedals / Assembly - Cover - Footwell - RH (RHD) (Remove and Replace)
Removal
- Fully open the driver's door.
- Move the driver's seat rearward for access.
- Remove the RH center console closeout extension (refer to procedure).
- Release the clips (x2) that secure the footwell cover trim to
the dash.
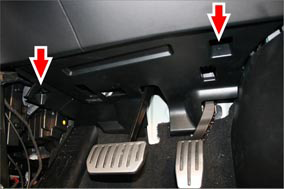
- Disconnect the footwell lamp harness connection.
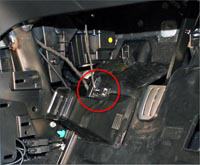
- Remove the footwell cover.
Installation procedure is the reverse of removal, except for the following:
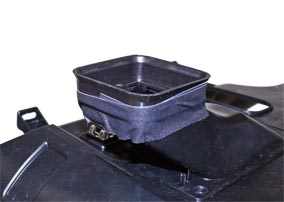
- If a new footwell cover trim is being installed, transfer the
air duct adapter to the new footwell cover trim.
Note: Wrapping the air duct adapter to the footwell cover trim with tape keeps the adapter in place during installation.
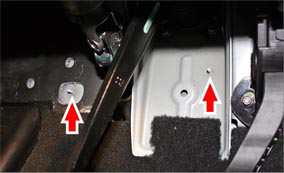
- When reinstalling, align the rectangular slots on the footwell
cover into the studs (x2) on the body before securing the clips.
READ NEXT:
 Rear View Mirror - 1st Generation (Remove and Replace)
Note: This procedure describes how to remove and replace
the 1st generation rear view mirror. If the vehicle is equipped with
a 2nd generation rear view mirror, refer to procedure 15050502 (re
Rear View Mirror - 2nd Generation (Remove and Replace)
Note: This procedure describes how to remove and replace
the 2nd generation rear view mirror. If the vehicle is equipped with
a 1st generation rear view mirror, refer to procedure 15050202 (re
SEE MORE:
Refrigerant evacuation and recharging
The HVAC and battery coolant circuits are sealed to prevent the
discharge of refrigerant. The refrigerant must be recovered before any
removal of system components using the recommended equipment.Two
ports are provided on the HVAC system and are accessible under the hood.
Warning: Ens
Fork and Control Link - Door - Exterior Handle - Front - LH (Remove and
Replace)
Removal
Remove Door Motor (refer to procedure)
Remove Door Grip (refer to procedure)
Remove press sensor screw.
Release door press sensor wiring connector.
Remove pivot pin connecting control link to PVT cartrid
© 2019-2026 Copyright www.tesms.org
