Tesla Model S: Back Plate - Door - Exterior Handle - Front - LH (Remove and Replace)
Tesla Model S (2012-2026) Service Manual / Closures / Back Plate - Door - Exterior Handle - Front - LH (Remove and Replace)
Removal
- Remove door handle for access (refer to procedure)
- Position handle assembly on a soft working surface.
- Remove door handle rear seal.
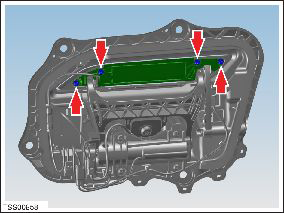
- Remove screws (x4) securing handle grip backplate and remove
(torque 2 Nm).
- Install back plate starting with inner fixings first. Ensure the LED wiring is correctly routed to avoid chafing.
- Install door handle rear seal.
- Check door handle for smooth operation.
READ NEXT:
 Back Plate - Door - Exterior Handle - Rear - LH (Remove and Replace)
Removal
Remove door handle for access (refer to procedure)
Position handle assembly on a soft working surface.
Remove door handle rear seal.
Remove screws (x4) securing handle gri
LED - Door - Exterior Handle - Front - LH (Remove and Replace)
Removal
Remove backplate grip (refer to procedure)
Disconnect LED wiring and remove from door grip.
Installation
Motor - Door - Exterior Handle - Front - LH (Remove and Replace)
Removal
Remove door handle for access (refer to procedure)
Position handle assembly on a soft working surface.
Remove door handle rear seal.
Release motor harness connector.
R
SEE MORE:
Limitations
Smart Summon is unlikely to operate as intended in the
following types of situations:
GPS data is unavailable due to poor cellular coverage.
The driving path is sloped. Smart Summon is
designed to operate on flat roads only (up to 10%
grade).
A raised concrete edge is detected. Depending on
Transmitter - Remote Keyless Entry (RKE) - Programming
Key LearnCaution: Before beginning this procedure, it is necessary to
have all keys present. Any keys that are not present will deactivate
after completing the procedure.
Sit in the driver's seat and step on the brake pedal to turn on
the drive rail.
Connect a laptop with To
© 2019-2026 Copyright www.tesms.org
