Tesla Model S: Motor - Door - Exterior Handle - Front - LH (Remove and Replace)
Tesla Model S (2012-2026) Service Manual / Closures / Motor - Door - Exterior Handle - Front - LH (Remove and Replace)
Removal
- Remove door handle for access (refer to procedure)
- Position handle assembly on a soft working surface.
- Remove door handle rear seal.
- Release motor harness connector.
- Remove cable ties securing door pressure sensor and motor wiring.
- Release motor wiring connector.
- Remove screws (x4) securing motor to housing (torque 4 Nm).
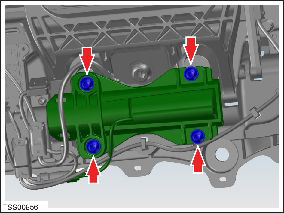
- Release motor from dowels disengage motor gear spigot from
housing.
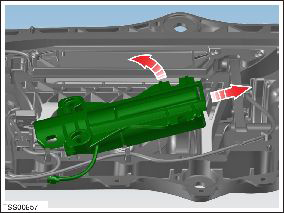
- Carefully remove motor.
- Remove screws (x3) securing mounting bracket to motor (torque 1 Nm).
- Remove bracket from motor.
- Installation procedure is the reverse of removal, except for the following.
- Install bracket to the motor and secure with screws. Ensure the motor wiring is correctly routed through the bracket.
- Install motor to housing, locate gear spigot and position on dowels. Secure motor with screws (x4) and connect wiring.
- Position wiring to housing and secure with cable ties.
- Install the door handle rear seal.
- Install door handle to panel.
READ NEXT:
 Motor - Door - Exterior Handle - Rear - LH (Remove and Replace)
Removal
Remove door handle for access (refer to procedure)
Position handle assembly on a soft working surface.
Remove door handle rear seal.
Remove cable ties securing door pressu
PCB - Door - Exterior Handle - Front - LH (Remove and Replace)
Removal
Remove fork and control link for acces (refer to procedure)
Remove screws (x3) securing PCB to housing (torque 1.5 Nm).
Press Sensor - Door - Exterior Handle - Front - LH (Remove and Replace)
Removal
Remove door handle for access (refer to procedure)
Position handle assembly on a soft working surface.
Remove door handle rear seal.
Remove cable ties securing door pressu
SEE MORE:
Vent - Motorized - Front Fascia - LH (Remove and Replace)
Removal
If the vehicle is equipped with 1st generation front fascia
applique, remove front fascia applique (refer to procedure) .
Remove ankle catcher foam, if equipped.
Disconnect motorized vent harness connector.
Park Brake Caliper - Release - Harness Tool - Through Calipers
Special Tools Required:
1030924-00-A EPB RELEASE TOOL, HARNESS
1030925-00-A ASY, RELEASE TOOL, EPB CONTROLLER REWORK
Perform this procedure on both sides of the vehicle, if
necessary.
Chock the front wheels.
Use a floorjack to lift the rear corner of the
© 2019-2026 Copyright www.tesms.org
