Tesla Model S: Adjusting Steering Yoke Position
Tesla Model S (2012-2026) Owner's Manual / Driving / Steering Yoke / Adjusting Steering Yoke Position
To adjust the steering yoke, touch Controls and touch the Steering icon.
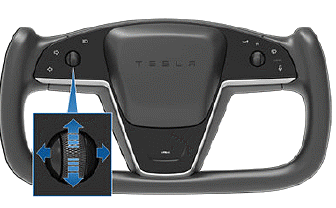
Use the left scroll button on the steering yoke to move the steering yoke to the desired position:
- To adjust the height/tilt angle of the steering yoke, roll the left scroll button up or down.
- To move the steering yoke closer to you, or further away from you, press the left scroll button to the left or right.
WARNING: Do not make steering yoke adjustments while driving.
Adjusting Steering Effort
You can adjust the feel and sensitivity of the steering system to suit your personal preference:
1. On the touchscreen, touch Controls > Pedals & Steering > Steering Mode.
2. Choose a steering option:
- Comfort - Reduces the effort required to turn the steering yoke. In town, Model S feels easier to drive and park.
- Standard - Tesla believes that this setting offers the best handling and response in most conditions.
- Sport - Increases the effort required to turn the steering yoke. When driving at higher speeds, Model S feels more responsive.
READ NEXT:
 Overview of Steering Yoke Buttons
Your Model S features stalkless driving in which all
controls you need when driving are accessible on the
steering yoke.
Right turn signal
High beam headlights*
Left turn signal
Left scroll b
Left Scroll Button
Use the scroll button on the left side of the steering yoke
to adjust the position of the mirrors and steering yoke. It
also controls the wipers and media player.
When using media player, push th
Right Scroll Button
Use the scroll button on the right side of the steering
yoke to control Autopilot features such as Autosteer and
Traffic-Aware Cruise Control:
When driving, push and release the button to engage
SEE MORE:
Battery Care
Never allow the Battery to fully discharge. Even when
Model S is not being driven, its Battery discharges very
slowly to power the onboard electronics. The Battery
can discharge at a rate of approximately 1% per day,
though the discharge rate may vary depending on
environmental factors (such as
Firmware Update - CHAdeMO Charging Adapter
Tools required:
12V power supply
Laptop with Toolbox 2.0 or higher
USB-CAN dongle
CHAdeMO CAN programming connector
CAN Setup
Connect the USB-CAN dongle to a laptop that is equipped with
Toolbox 2.0 or higher.
Connect the CHAdeMO CAN programming connector to the
© 2019-2026 Copyright www.tesms.org
