Tesla Model S: Motor - Door - Exterior Handle - Rear - LH (Remove and Replace)
Tesla Model S (2012-2026) Service Manual / Closures / Motor - Door - Exterior Handle - Rear - LH (Remove and Replace)
Removal
- Remove door handle for access (refer to procedure)
- Position handle assembly on a soft working surface.
- Remove door handle rear seal.
- Remove cable ties securing door pressure sensor and motor wiring.
- Release motor wiring connector.
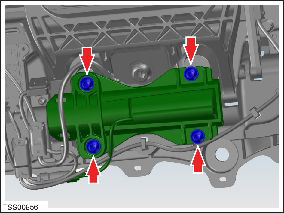
- Remove screws (x4) securing motor to housing (torque 4 Nm).

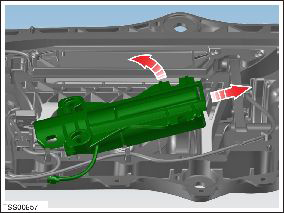
- Release motor from dowels disengage motor gear spigot from
housing.

- Carefully remove motor.
- Remove screws (x3) securing mounting bracket to motor (torque 1 Nm).
- Remove bracket from motor.
- Installation procedure is the reverse of removal, except for the following.
- Install bracket to the motor and secure with screws. Ensure the motor wiring is correctly routed through the bracket.
- Install motor to housing, locate gear spigot and position on dowels. Secure motor with screws (x4) and connect wiring.
- Position wiring to housing and secure with cable ties.
- Install the door handle rear seal.
- Install door handle to panel.
READ NEXT:
 PCB - Door - Exterior Handle - Front - LH (Remove and Replace)
Removal
Remove fork and control link for acces (refer to procedure)
Remove screws (x3) securing PCB to housing (torque 1.5 Nm).
 Press Sensor - Door - Exterior Handle - Front - LH (Remove and Replace)
Removal
Remove door handle for access (refer to procedure)
Position handle assembly on a soft working surface.
Remove door handle rear seal.
Remove cable ties securing door pressu
 Press Sensor - Door - Exterior Handle - Rear - LH (Remove and Replace)
Removal
Remove door handle for access (refer to procedure)
Position handle assembly on a soft working surface.
Remove door handle rear seal.
Remove cable ties securing door pressu
SEE MORE:
 Actuator - Pedestrian Protection - LH (Remove and Replace)
Warning: If the 12V power supply is disconnected, do
not attempt to open any doors with door glass in closed
position. Failure to follow this instruction could result in
door glass shatter.
Note: Before disconnecting the 12V power supply,
ensure that the driver's door window
 Underhood Storage Unit (RWD) (Remove and Install)
Removal
Remove the underhood storage extension box (refer to procedure).
Remove the rear underhood apron (refer to procedure).
Remove the front underhood apron (refer to procedure).
Disconnect the fir tree clips (x2) that fasten the hood release
cable to the lower left e
© 2019-2026 Copyright www.tesms.org

