Tesla Model S: Battery Chiller and TXV Assembly (Remove and Replace)
Tesla Model S (2012-2026) Service Manual / Thermal Management / Battery Chiller and TXV Assembly (Remove and Replace)
Warning: If the 12V power supply is disconnected, do not attempt to open any doors with door glass in closed position. Failure to follow this instruction could result in door glass shatter.
Note: Before disconnecting the 12V power supply, ensure that the driver's door window is fully open. Failure to follow this instruction could result in vehicle lockout.
Removal
- Remove the front aero shield (refer to procedure).
- Recover refrigerant from the vehicle (refer to procedure).
- Disconnect 12V power.
- Rear wheel drive (RWD): Refer to procedure.
- Dual Motor: Refer to procedure.
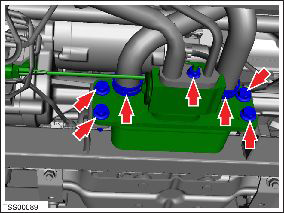
- Remove the nut that secures the air conditioning pipe to the TXV (torque 12 Nm). Release the pipe and collect the O-rings. Plug the pipe and TXV. Caution: Remove and discard O-rings.
- Disconnect the TXV electrical connector.
- Clamp the coolant hoses to minimize coolant loss.
- Position the tray and release the clips (x2) and coolant hoses from the TXV.
- Remove the bolts (x4) that secure the battery chiller and TXV
assembly to the subframe and remove the assembly (torque 12 Nm).
Installation procedure is the reverse of removal.
READ NEXT:
 Cooling System - Partial Refill and Bleed
Refill
Caution: Use the specified coolant only. In this manual, refer
to General Information > Capacities, Fluids, and Lubricants >
Fluids.
Remove the coolant reservoir cap (r
Cooling System - Drain and Refill
Note: Make sure at least 14 L of the specified coolant is
available before beginning this procedure.
Caution: Use the specified coolant only. In this manual, refer
to General Informati
Coolant System - Check and Fill
Check & Top-Up
Remove coolant cap from reservoir.
Fill reservoir to correct level.
Reinstall the cap.
SEE MORE:
Lifting and Jacking
Raising and supporting the vehicle
Jacking points on the Model S
Caution: Do not jack or support the vehicle on any other points
than those shown. Failure to comply will result in damage to the body or
chassis components.
Two post lift
Refer to procedure 10000205 for instru
Multi-Collision Braking
In addition to Automatic Emergency Braking, your
vehicle may apply the brakes to prevent or mitigate a
subsequent impact after an initial collision if airbag
deployment is detected. The brakes may be applied
regardless of driving speed.
Obstacle-Aware Acceleration
Obstacle-Aware Acceleration is
© 2019-2026 Copyright www.tesms.org
