
Tesla Model S: Body Glass - Rear Quarter - LH (Remove and Replace)
Tesla Model S (2012-2026) Service Manual / Body / Body Glass - Rear Quarter - LH (Remove and Replace)
Warning: To avoid personal injury, wear cut-resistant gloves when performing this operation. Note: Use Dow Betaseal Express or an equivalent fast-curing glass adhesive to perform this procedure. Removal
- Remove the LH body side brightwork (refer to procedure).
- Remove the LH rear sill panel trim (refer to procedure).
- Carefully release the clips (x3) that secure the headliner to the cantrail. Caution: Take care not to damage component(s).
- Remove the screws (x2) that secure the rear quarter glass
assembly to the body.
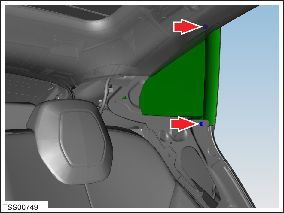
- Use auto glass cut-out wire and wire gripping handles to cut the adhesive bonding the quarter glass to the body.
- Depress the clip and release it from the body. Caution: Take care not to damage component(s). Caution: Replace any broken clips.
- Remove the quarter glass assembly from the vehicle.
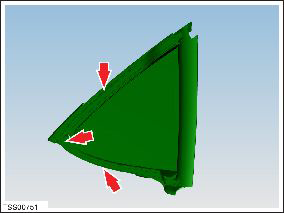
Installation procedure is the reverse of removal, except for the following:
- Clean and polish the glass.
- Apply primer as directed by the adhesive manufacturer. Note: Check the primer and adhesive packaging for the appropriate working times for each product. Prepare the necessary tools and the work environment so that the glass can be installed within the specified working times.
- Assemble the adhesive applicator.
- Apply suitable adhesive to body openings.
- Align glazing in the body opening.
- Apply suitable tape to secure the glazing while the adhesive cures.
Warning: Do not drive the vehicle until the adhesive has cured. Refer to the adhesive packaging for the safe drive-away time.
Note: Ensure that excess adhesive is removed prior to installing the brightwork.
READ NEXT:
 Liftgate Glass (Remove)
Warning: To avoid personal injury, wear cut-resistant
gloves when performing this operation.
Note: Use Dow Betaseal Express or an equivalent fast-curing
glass adhesive to perform this proced
Liftgate Glass (Install)
Installation
Use the adhesive scraper to remove the excess urethane from the
liftgate glass and body.
Temporarily reconnect the CHMSL to the harness in the center of
the liftgate
SEE MORE:
Air Line - Air Suspension - Compressor to Valve Block (Remove and Replace)
Warning: To avoid personal injury, eye protection must be
worn when performing this operation.Removal
Raise and support the vehicle (refer to procedure).
Disconnect 12V power.
Rear wheel drive (RWD): Refer to
procedure.
Dual Motor: Refer to pr
Module - HVAC Controller - RCCM (Remove and Replace)
Removal
Remove the IP carrier (refer to procedure).
Disconnect the HVAC harness connector from the Remote Climate
Control Module (RCCM).
Remove the screws (x4) that secure the RCCM to the HVAC casing.
Remove the
© 2019-2026 Copyright www.tesms.org
