Tesla Model S: Cable - Latch - Hood - LH (Dual Motor) (Remove and Replace)
Tesla Model S (2012-2026) Service Manual / Closures / Cable - Latch - Hood - LH (Dual Motor) (Remove and Replace)
Removal
- Remove the underhood storage unit (refer to procedure).
- Release the rear cable from the latch assembly.
Note: If performing this procedure on the RH side, release the front cable.
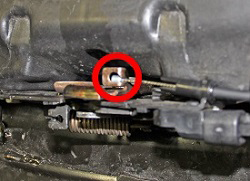
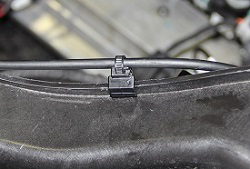
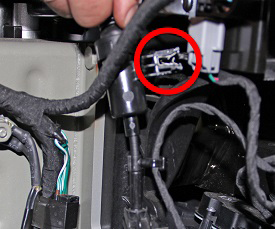
- Release the clip that secures the cable to the front carrier.
- Release the clip that secures the cable spring assembly to the
front carrier.
Note: The RH actuator does not have a cable spring assembly.
- Release the cable from the cable abutment bracket.
- Release the cable from the actuator.
- Remove the cable from the vehicle.
Installation procedure is the reverse of removal, except for the following:
Note: Ensure that the hood functions properly.
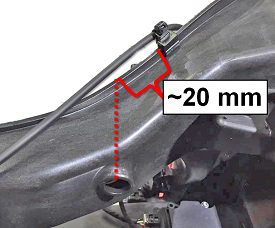
Install the clip that secures the front carrier approximately 20 mm outboard of the hole in the front of the carrier.
READ NEXT:
 Actuator - Latch - Hood - LH (Dual Motor) (Remove and Replace)
Removal
Remove the ankle catcher (refer to procedure).
Remove the LH and RH condenser ducts (refer to procedure).
Remove the plastic rivets (x3) that secure the center louver
asse
Gas Strut - Hood - LH (Remove and Replace)
Removal
Open hood.
Support hood in open position.
Release clip securing gas strut to body.
Disconnect gas strut fro
Striker - Hood (Remove and Replace)
Removal
Open the hood for access.
If the vehicle is rear wheel drive (RWD), remove the clips (x6)
that secure the acoustic panel to the hood and carefully peel back
the acoustic p
SEE MORE:
Controlling Lights
Touch Controls > Lights to control the lights.
NOTE: You can also access an abbreviated lights menu
while driving by touching the Auto High Beam button on
the steering yoke. A lights menu displays on the
touchscreen, providing quick access to headlight
controls.
In addition to the lights that
Antenna - GPS (Remove and Replace)
Removal
Remove liftgate glazing (refer to procedure)
Disconnect GPS harness connector.
Release GPS antenna from adhesive bond.
Release wiring harness from liftgate.
Note: Note installed pos
© 2019-2026 Copyright www.tesms.org
