Tesla Model S: Actuator - Latch - Hood - LH (Dual Motor) (Remove and Replace)
Tesla Model S (2012-2026) Service Manual / Closures / Actuator - Latch - Hood - LH (Dual Motor) (Remove and Replace)
Removal
- Remove the ankle catcher (refer to procedure).
- Remove the LH and RH condenser ducts (refer to procedure).
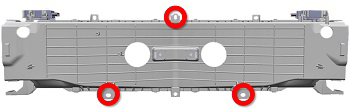
- Remove the plastic rivets (x3) that secure the center louver
assembly.
Note: The following image shows the center louver assembly from the rear.
- Carefully release the radiator assembly and let it hang down. Note: This allows access to the screws (x2) that secure the actuator.
- Remove the hood latch cable (refer to procedure).
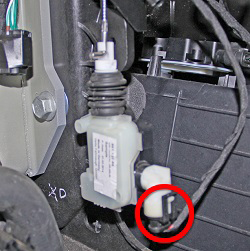
- Disconnect the electrical connector from the actuator.
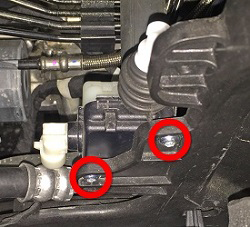
- Remove the screws (x2) that secure the actuator (torque 2.5 Nm).
- Remove the actuator from the vehicle.
Installation procedure is the reverse of removal.
READ NEXT:
 Gas Strut - Hood - LH (Remove and Replace)
Removal
Open hood.
Support hood in open position.
Release clip securing gas strut to body.
Disconnect gas strut fro
Striker - Hood (Remove and Replace)
Removal
Open the hood for access.
If the vehicle is rear wheel drive (RWD), remove the clips (x6)
that secure the acoustic panel to the hood and carefully peel back
the acoustic p
Latch - Hood - Primary (RWD) (Remove and Replace)
Removal
Remove the hood latch cover (refer to procedure).
Remove the nuts (x2) that secure the latch assembly to the
crossmember (torque 16 Nm).
Release the latch assembly from th
SEE MORE:
Finisher - Liftgate - Rear Window - Side - LH (Remove and Replace)
Removal
Remove the upper rear window finisher (refer to procedure).
Release the clips (x3) and remove the tailgate side finisher.
Caution: Take care not to damage component(s).
Note: Components have been removed in this graphic
to aid clarity.
Remove Front Drive Unit
Position the support jack on top of the front
crossmember and secure the 2 screws to the front crossmember.
The support jack mounts to the bolt holes on top of the front
crossmember that secured the coolant reservoir.
© 2019-2026 Copyright www.tesms.org
