Tesla Model S: Switch - Back Rest and Cushion Adjust - Driver's Seat (Remove and Replace)
Tesla Model S (2012-2026) Service Manual / Seats / Switch - Back Rest and Cushion Adjust - Driver's Seat (Remove and Replace)
Removal
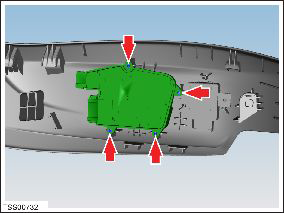
- Remove driver seat outer side cover (refer to procedure)
- Remove screws (x4) securing back rest and cushion adjust switch
to cover (torque 1 Nm).

- Remove back rest and cushion adjust switch.
READ NEXT:
 Seat Assembly - Driver's (Remove and Install)
Removal
Note the customer's seating profile.
Position the vehicle to provide good access to the driver's
seat.
Power the seat fully rearward for access.
Release the clips (x4)
 Seat Cushion - Lower - 2nd Row (Remove and Install)
Removal
Remove the 2nd row center console assembly, if installed (refer
to procedure).
Gently lift up the LH side of the 2nd row seat bottom cushion to
expose the grommet tower.
 Seat Cushion - Lower - 2nd Row - Executive - LH (Remove and Replace)
Removal
Remove the 2nd row center console (refer to procedure).
Use both hands to firmly pull up on the front of the cushion to
release the 2 clips that secure it to the frame. Do not
SEE MORE:
 Applique - Fascia - Front - 1st Generation (Remove and Replace)
Note: This procedure describes how to remove and replace
the 1st generation front fascia applique. If the vehicle is equipped
with a 2nd generation front fascia applique, refer to procedure
10011302 (refer to procedure).
Removal
Remove the front fascia grill (refer to p
 Frame - Panoramic Roof Assembly (Remove and Replace) -
Removal
Warning: To avoid
personal injury, wear cut-resistant gloves when performing this
operation.
Special tools required for this procedure:
Supplier
Part Number
Description
© 2019-2026 Copyright www.tesms.org

