Tesla Model S: Striker - Hood (Remove and Replace)
Tesla Model S (2012-2026) Service Manual / Closures / Striker - Hood (Remove and Replace)
Removal
- Open the hood for access.
- If the vehicle is rear wheel drive (RWD), remove the clips (x6)
that secure the acoustic panel to the hood and carefully peel back
the acoustic panel for access.
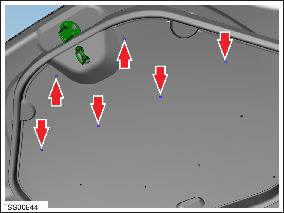
- Mark the installed position of the striker plate to aid installation.
- Remove the bolts (x3 for RWD vehicles, x2 for DM vehicles) that
secure the striker to the hood (torque 20 Nm).
Note: The following image shows the hood striker for a RWD vehicle.
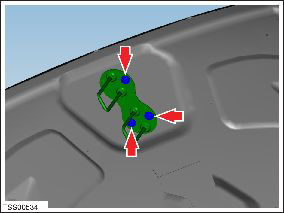
- Remove the striker assembly.
Installation procedure is the reverse of removal, except for the following:
Note: The hood striker on DM vehicles has adjustment slots. Ensure that the bolts (x2) are centered in the slots during installation.
Clean any witness marks from the painted surface.
READ NEXT:
 Latch - Hood - Primary (RWD) (Remove and Replace)
Removal
Remove the hood latch cover (refer to procedure).
Remove the nuts (x2) that secure the latch assembly to the
crossmember (torque 16 Nm).
Release the latch assembly from th
Latch - Hood - Secondary (RWD) (Remove and Replace)
Removal
Remove the front underhood apron (refer to procedure).
Remove the bolts (x2) that secure the secondary latch to the
crossmember (torque 10 Nm).
Cauti
Latch - Hood (Dual Motor) (Remove and Replace)
Removal
Remove the front underhood apron (refer to procedure).
Remove the front fascia applique (refer to procedure).
Disconnect the harness from the LH side of the latch.
SEE MORE:
Brake Pads - Rear - Set (Remove and Replace)
Warning: If the
vehicle has air suspension, activate "Jack" mode on the
touchscreen before raising and supporting the vehicle.
Special tool required for this procedure:
Supplier
Part Number
Cleaning the Interior
Frequently inspect and clean the interior to maintain its
appearance and to prevent premature wear. If possible,
immediately wipe up spills and remove marks. For
general cleaning, wipe interior surfaces using a soft cloth
(such as microfiber) dampened with a mixture of warm
water and mild non-d
© 2019-2026 Copyright www.tesms.org
