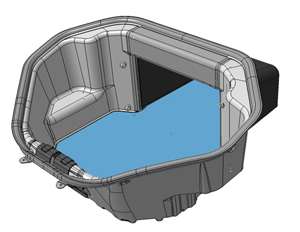
Tesla Model S: Carpet - Underhood Storage (Remove and Install)
Tesla Model S (2012-2026) Service Manual / Interior trim / Carpet - Underhood Storage (Remove and Install)
Removal
- Open the hood.
- Remove the lower carpet from the underhood storage area.
- Remove the upper trim panel by pulling down on the bottom, then
pulling out toward the front of the vehicle.
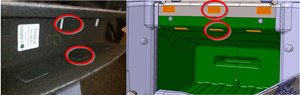
- Inspect the Dual Lock fasteners (x6) on both the upper trim
panel and the frunk interior. If any are loose or damaged:
- Remove and discard the loose or damaged piece.
- Clean the area with an alcohol wipe.
- Attach a new piece of Dual Lock fastener.
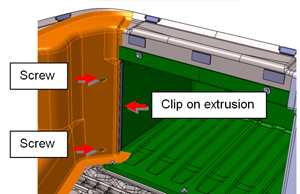
- Unscrew the knobs (x4) at the rear of the frunk.
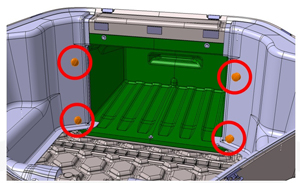
- Pull each side panel away from the screws and release it from
the clip on the extrusion at the back of the frunk.
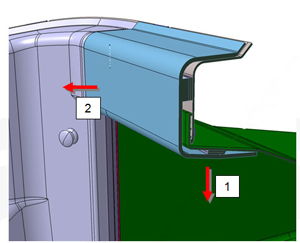
- Pull the carpeted side panels out from the rubber seal that runs around the top of the frunk. Caution: Do not loosen or remove the seal.
- Pull the front latch cover toward the back of the frunk and
release the carpeted side panels from underneath it.
- Inspect the extrusions (x2) at the back of the frunk. If either
is loose or damaged:
- Remove and discard the damaged part.
- Clean the surface with an alcohol wipe.
- Replace the extrusion.
- Remove the underhood storage carpet.
Installation procedure is the reverse of removal.
READ NEXT:
 Carpet - Underhood Storage (Dual Motor) (Remove and Install)
Removal
Peel back the carpeting at the front of the underhood storage
unit.
Disconnect the emergenc
Carpet - Interior Complete (Remove and Replace)
Removal
Remove driver seat (refer to procedure)
Remove passenger seat.
Remove driver footrest (refer to procedure)
Remove LH sill panel trim (refer to procedure)
Remove RH sil
SEE MORE:
Seat Cushion - Lower - 2nd Row - Executive - LH (Remove and Replace)
Removal
Remove the 2nd row center console (refer to procedure).
Use both hands to firmly pull up on the front of the cushion to
release the 2 clips that secure it to the frame. Do not fully remove
the cushion at this time.
To Pause Parking
To pause Autopark, press the brake pedal once. Model S
stops and remains stopped until you touch Resume on
the touchscreen.
To Cancel Parking
Autopark cancels the parking sequence when you
manually move the steering yoke, shift, or touch Cancel
on the touchscreen. Autopark also cancels parking
© 2019-2026 Copyright www.tesms.org
