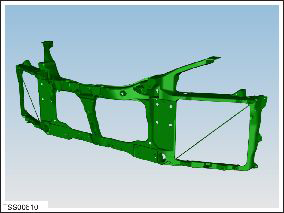
Tesla Model S: Carrier - Bumper - Front (Remove and Replace)
Tesla Model S (2012-2026) Service Manual / Body / Carrier - Bumper - Front (Remove and Replace)
Warning: If the vehicle has air suspension, activate "Jack" mode on the touchscreen before raising and supporting the vehicle.
Removal
- Recover refrigerant from the vehicle (refer to procedure).
- Raise and support the vehicle (refer to procedure).
- Remove the radiator (refer to procedure).
- Remove the active louver assembly (refer to procedure).
- Remove the LH headlight (refer to procedure).
- Remove the RH headlight.
- Remove the LH horn (refer to procedure).
- Remove the RH horn.
- Remove the front antenna (refer to procedure).
- Remove the LH impact sensor (refer to procedure).
- Remove the RH impact sensor.
- Remove the front aero shield (refer to procedure).
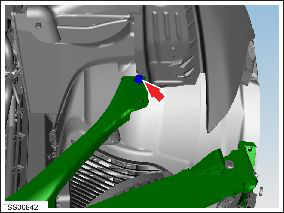
- Remove the bolts (x2) that secure the front bumper carrier to
the body (torque 4 Nm).
Note: LH bolt shown for clarity.
- Remove the bolt that secures the LH staybar to the carrier
(torque 11 Nm).
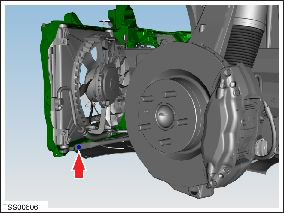
- Remove the nut that secures the air conditioning pipe to the LH
condenser (torque 8 Nm).
- Disconnect the pipe and tie aside. Caution: Plug pipe connections to prevent ingress of moisture or dirt. Caution: Remove and discard O-rings. Caution: Lubricate new O-rings with clean refrigerant oil.
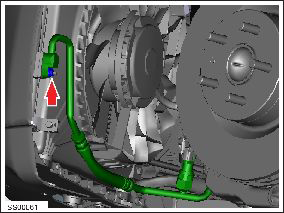
- Remove the nut that secures the inboard air conditioning link pipe (torque 15 Nm).
- Disconnect the pipe from the condenser and tie aside.
- Disconnect the condenser fan motor connector.
- Remove the screws (x4) that secure the condenser mounting clamps
(torque 3 Nm).
- Release the condenser from the lower mounting and collect the clamps.
- Release the condenser assembly from the upper mounting and remove from the vehicle.
- Repeat the previous 9 steps and remove the RH condenser.
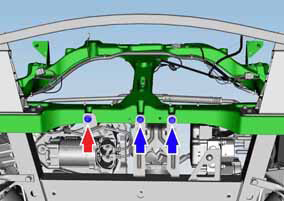
- Remove the following hardware:
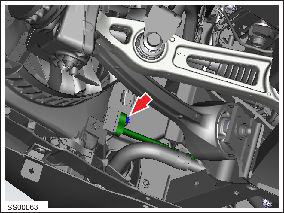
- the bolt that secures the air suspension compressor bracket to the carrier (red arrow) (torque 6 Nm)
- the bolts (x2) that secure the vacuum pump mounting bracket to the front bumper carrier (blue arrows) (torque 6 Nm)
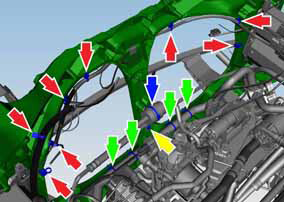
- Remove the following hardware:
- the clip that secures the air suspension compressor pump valve to the carrier (blue arrow). Tie the valve aside
- the bolt that secures the inboard air conditioning link pipe to the carrier (yellow arrow) (torque 11 Nm). Remove the pipe
- the clips (x4) that secure the coolant hose to the carrier (green arrows)
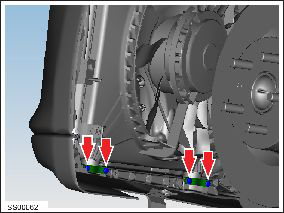
- the harness clips (x8) that secure the harness to the carrier (red arrows)
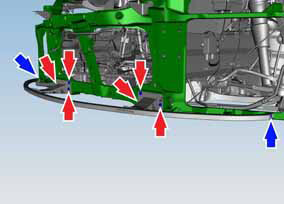
- Remove the following hardware:
- the LH and RH ankle catcher end screws (x2) (blue arrows) (torque 11 Nm)
- the bolts (x6) that secure the ankle catcher to the crash structure (red arrows) (torque 11 Nm)
- Remove the ankle catcher (refer to procedure).
- Remove the front bumper carrier.
Installation procedure is the reverse of removal.
READ NEXT:
 Strut - Shock Tower to Bulkhead - LH (Remove and Replace)
Removal
Ensure that the wipers are in the off position by rotating the
end of the left-hand steering column lever towards the rear of the
vehicle.
Open the hood to the service pos
Windshield Assembly (Remove and Replace)
Note: Use Dow Betaseal Express or an equivalent fast-curing
glass adhesive to perform this procedure.
Special tool recommended for this procedure:
Supplier
Sensor - Light/Rain (Remove and Replace)
Removal
Remove the rear view mirror trim. (refer to procedure)
Press the spring clip while lifting the corners of the clip to
remove the sensor from the bracket.
SEE MORE:
Starting
When you open a door to enter Model S, the instrument
panel and touchscreen power on and you can operate all
controls. To shift Model S, press the brake pedal and
swipe up for Drive or down for Reverse on the
touchscreen's drive mode strip (see Shifting).
If Auto Shift out of Park is enabled, M
Front Drive Unit (From Below) (Remove and Install) - Removal
Special tools required for this procedure:
Supplier
Part Number
Description
Bosch
FMG-750
Transmission
Jack 750 Kg Europe only
© 2019-2026 Copyright www.tesms.org
