Tesla Model S: Seat Assembly - Driver's (Remove and Install)
Tesla Model S (2012-2026) Service Manual / Seats / Seat Assembly - Driver's (Remove and Install)
Removal
- Note the customer's seating profile.
- Position the vehicle to provide good access to the driver's seat.
- Power the seat fully rearward for access.
- Release the clips (x4) and remove the outer seat track cover.

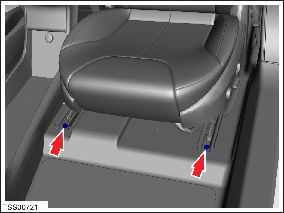
- Remove and discard the bolts (x2) that secure both seat tracks
to the floor panel (torque inboard bolt 34 Nm, outboard bolt 17 Nm).
- Power the seat fully forward for access.
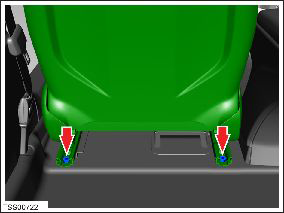
- Remove and discard the bolts (x2) that secure both seat tracks
to the floor panel (torque inboard bolt 34 Nm, outboard bolt 17 Nm).
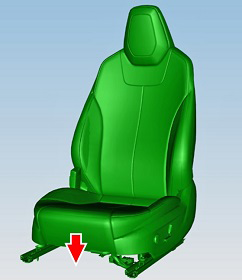
- Adjust the position of the seat for easy removal:
- Power the seat to the middle of the seat tracks.
- Position the seat backing so that it is in the most upright position.
- Power the seat fully downward towards the floor.
- Disconnect 12V power.
- Rear wheel drive (RWD): Refer to procedure.
- Dual Motor: Refer to procedure.
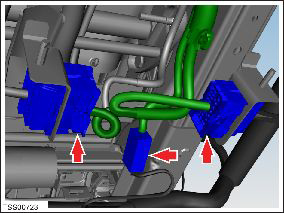
- Release the clips that secure the connectors, then disconnect
the seat connectors and harnesses (x3).
- With assistance, remove the seat from the vehicle. Caution: To avoid damage when moving or rotating the seat, hold the base with one hand and the back with the other. Have an assistant hold the other side in the same manner.
READ NEXT:
 Seat Cushion - Lower - 2nd Row (Remove and Install)
Removal
Remove the 2nd row center console assembly, if installed (refer
to procedure).
Gently lift up the LH side of the 2nd row seat bottom cushion to
expose the grommet tower.
Seat Cushion - Lower - 2nd Row - Executive - LH (Remove and Replace)
Removal
Remove the 2nd row center console (refer to procedure).
Use both hands to firmly pull up on the front of the cushion to
release the 2 clips that secure it to the frame. Do not
Back Rest Assembly - Seat - 2nd Row - LH (Remove and Install)
Removal
Remove rear seat base cushion for access (refer to procedure)
Remove the bolt that secures the seat belt to the 2nd row seat
base frame (torque 40 Nm).
SEE MORE:
Module - Sunroof Controller (RHD) (Remove and Replace)
Warning: If the 12V power supply is disconnected, do
not attempt to open any doors with door glass in closed position.
Failure to follow this instruction could result in door glass
shatter.
Note: Before disconnecting the 12V power supply,
ensure that the driver's door win
Seal - Door - Front - A Pillar - Margin - LH (Remove and Replace)
Removal
Open vehicle door, ensuring good access.
Carefully release clip (x1) securing top of flap seal to door.
Caution: Take care not to damage component(s).
Note: Components have been removed in this graphic
to aid clarity.
Caution:
© 2019-2026 Copyright www.tesms.org
