
Tesla Model S: Compressor - 2nd Generation (Remove and Replace)
Warning: Only technicians who have been trained in High Voltage Awareness are permitted to perform this procedure. Proper personal protective equipment (PPE) and insulating HV gloves with a minimum rating of class 00 (500V) must be worn any time a high voltage cable is handled. Refer to Tech Note TN-15-92-003, "High Voltage Awareness Care Points" for additional safety information.
Removal
- Recover refrigerant from the vehicle (refer to procedure).
- Perform the vehicle electrical isolation procedure (refer to procedure).
- Remove the underhood storage unit for access (refer to procedure).
- Raise and support the vehicle (refer to procedure). Warning: Do not work on an incorrectly supported vehicle.
- Remove the front skid plate (refer to procedure).
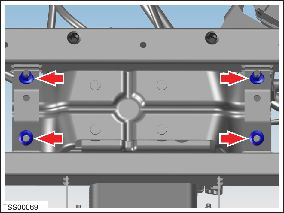
- Working beneath the vehicle, remove the nuts (x4) that secure
the compressor and bracket assembly to the front subframe (torque 10
Nm).
- Lower the vehicle.
- Release the compressor harness (#3 in the figure below) from the
orange connector on the top of the forward junction box (FJB).
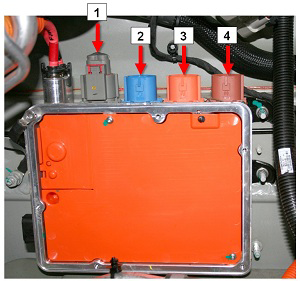
1 HV Battery heater harness 2 DCDC converter harness 3 Compressor harness 4 PTC heater harness - Disconnect the compressor logic harness.
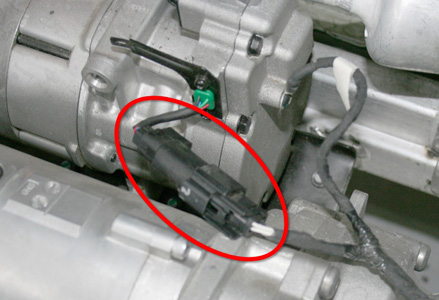
- Remove the screw that secures the ground wire to the compressor
(torque 7 Nm). Release the ground wire.
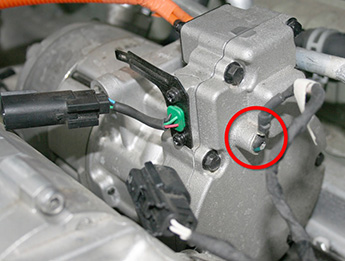
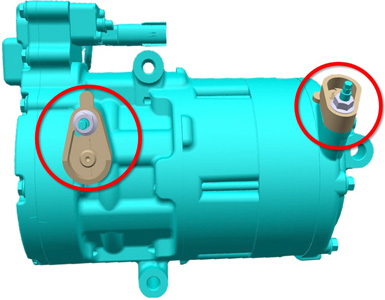
- Remove the nuts (x2) that secure the A/C suction and discharge
lines to the compressor (torque 10 Nm). Release the lines and remove
the seals. Plug the holes.
Note: The following figure shows the compressor from the rear of the vehicle.
Caution: The holes must be plugged to prevent contamination.
Caution: Remove and discard O-rings.
- Remove the compressor and bracket assembly.
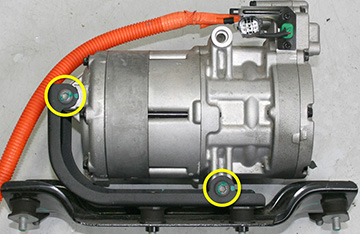
- Remove the screws (x2) that secure the compressor to the inner
bracket (torque 24 Nm).
Caution: The HV cable is connected to the compressor; it cannot be removed.
Installation procedure is the reverse of removal, except for the following:
Caution: The amount of oil in the new A/C compressor needs to equal the amount of oil from the old one. To do this, use a digital scale to weigh both the old and new A/C compressors. Turn the new one upside down to drain a small amount of fluid, then re-weigh it. Repeat this process until the new A/C compressor weighs the same as the old one.
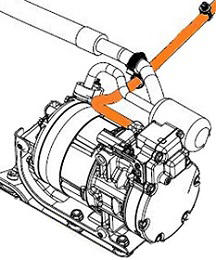
- Ensure that the HV cable is routed under the suction and
discharge lines and that the clip is installed onto the suction
line.
- Recharge the A/C system.
- Ensure there is sufficient clearance between the HV connector and the bottom of the underhood storage compartment. If there is contact, adjust the position of the bracket that supports the HV connector.
READ NEXT:
 Compressor (Dual Motor) (Remove and Replace)
Warning: Only technicians who have been trained in High
Voltage Awareness are permitted to perform this procedure. Proper
personal protective equipment (PPE) and insulating HV gloves with a
Compressor (Dual Motor) (RHD) (Remove and Replace)
Warning: Only technicians who have been trained in High
Voltage Awareness are permitted to perform this procedure. Proper
personal protective equipment (PPE) and insulating HV gloves with a
Mounting - Air Conditioning Compressor (Remove and Replace)
Removal
Remove air conditioning compressor (refer to procedure)
Unscrew compressor isolators from mounting bracket.
Note: Inspect mounting rubber and replace as
necessar
SEE MORE:
Brake Caliper - Front - LH (Remove and Replace)
Warning: If
the vehicle has air suspension, activate "Jack" mode on the
touchscreen before raising and supporting the vehicle.
Removal
Remove the rear underhood apron
(refer to procedure).
Remove the brake fluid reservoir cap and place
an absorbent materi
Frame - Panoramic Roof Assembly (Remove and Replace) -
Installation
Installation
Use a scraping tool to remove the majority of
the adhesive from the body, leaving a smooth layer of the original
adhesive approximately 1 mm thick or less.
Remove all existing butyl patches and replace
them with new ones
