Tesla Model S: Compressor (Dual Motor) (RHD) (Remove and Replace)
Warning: Only technicians who have been trained in High Voltage Awareness are permitted to perform this procedure. Proper personal protective equipment (PPE) and insulating HV gloves with a minimum rating of class 00 (500V) must be worn any time a high voltage cable is handled. Refer to Tech Note TN-15-92-003, "High Voltage Awareness Care Points" for additional safety information.
Removal
- Recover refrigerant from the vehicle (refer to procedure). Note: Continue this procedure while the A/C is being recovered.
- Remove the 12V battery (refer to procedure).
- Remove the 12V battery bracket beam (refer to procedure).
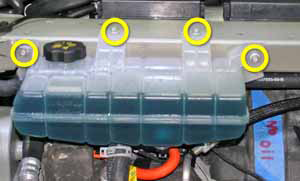
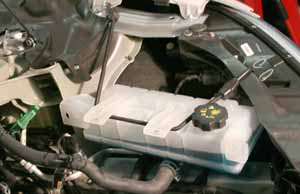
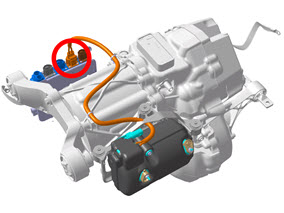
- Ensure that the cap on the coolant reservoir is properly secured.
- Release the bolts (x4) that secure the coolant reservoir to the
front crossmember (torque 6 Nm). Do not remove the reservoir at this
time.
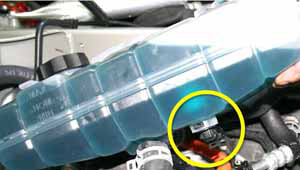
- Carefully lift up the coolant reservoir and disconnect the
coolant level sensor harness.
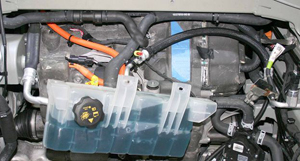
- Pull the reservoir forward into the underhood area.
Note: The reservoir hose is routed behind the hose that connects to the gearbox. Note the routing of the hoses and ensure that they are routed correctly during reinstallation.
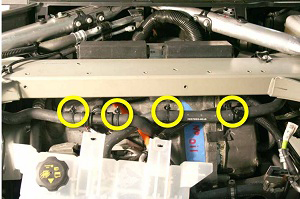
- Gently pull down on the 2 coolant hoses to release the clips
(x4) that secure them to the front crossmember.
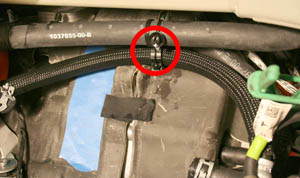
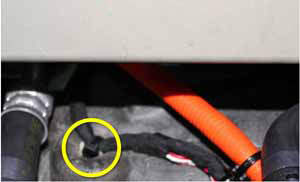
- Release the clip that secures the coolant reservoir hose to the
A/C line.
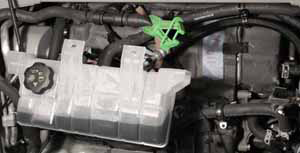
- On the LH side of the 3-way fitting, clamp the coolant hose that
leads to the differential housing. Remove the hose from the front
drive unit and and plug the nipple.
- Move the coolant reservoir to the LH side of the vehicle and
secure it out of the working area.
Caution: The reservoir is still secured to 2 coolant hoses.
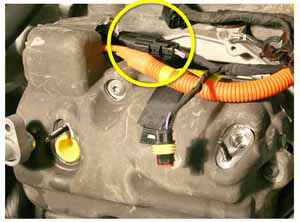
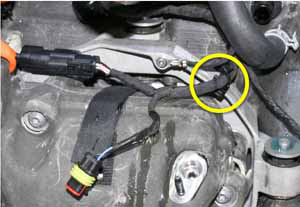
- Disconnect the compressor connector from the forward junction
box (FJB).
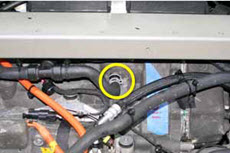
- Carefully cut the cable tie that secures the HV cable to the front drive unit. Note: Do not release the fir tree clip.
- Remove the nuts (x2) that secure the A/C suction and discharge
lines to the compressor (torque 10 Nm). Release the lines and remove
the seals. Plug the holes.
Caution: The holes must be plugged to prevent contamination. Caution: Remove and discard O-rings.
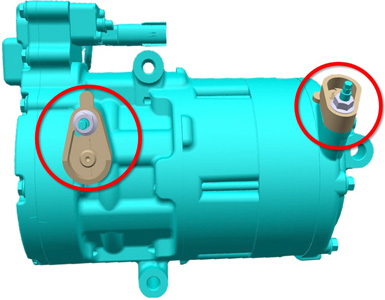
- Disconnect the compressor LV harness.
- Release the ground strap from the A/C compressor bracket (torque
7 Nm).
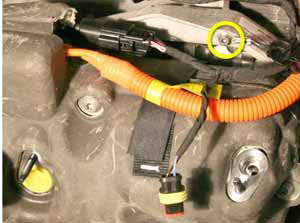
- Release the edge clip that secures the LV harnesses to the
compressor bracket.
- Release the fir tree clip that secures the LV harnesses to the
top of the front drive unit.
- Release the bolts (x3) that secure the compressor to the bracket
(torque 20 Nm).
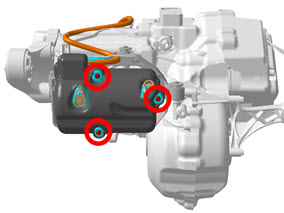
Caution: Do not spill oil from the compressor when removing it. The amount of oil remaining in the old compressor needs to be measured when the new compressor is installed.
- Remove the acoustic cover from the compressor.
Caution: The amount of oil in the new A/C compressor needs to equal the amount of oil from the old one. To do this, use a digital scale to weigh both the old and new A/C compressors. Turn the new one upside down to drain a small amount of fluid, then re-weigh it. Repeat this process until the new A/C compressor weighs the same as the old one.
- Transfer the acoustic cover to the new compressor.
- Recharge the AC system.
READ NEXT:
 Mounting - Air Conditioning Compressor (Remove and Replace)
Removal
Remove air conditioning compressor (refer to procedure)
Unscrew compressor isolators from mounting bracket.
Note: Inspect mounting rubber and replace as
necessar
Pipe - High Pressure - Sub-Cool Condenser to Chiller (Remove and Replace)
Removal
Recover refrigerant from the vehicle (refer to procedure)
Remove front skid plate (refer to procedure)
Remove nut (x1) securing pipe to sub-cool condenser (torque 8
Nm).
Pipe - High Pressure - Charge Port (Remove and Replace)
Removal
Recover refrigerant from the vehicle (refer to procedure)
Remove underhood storage unit (refer to procedure)
Remove nut securing pipe retaining plate to evaporator TXV
(to
SEE MORE:
Sensor - Intrusion - Door - Front (Remove and Replace)
Removal
Remove door trim panel (refer to procedure)
Remove screws (x2) securing impact sensor to door (torque 5 Nm).
Disconnect sensor harness connection.
Installation
Installation procedure is the reverse
Trim - 'B' Post - Lower - LH (Remove and Install)
Removal
Power the seat forward to gain access to the 'B' post.
Carefully release the leading edge of the rear rocker panel trim
for access.
Caution: Take care not to damage component(s).
Carefully release the trailing edge of the front rocker pan
