Tesla Model S: Condenser - Gas Cool (Remove and Replace)
Tesla Model S (2012-2026) Service Manual / Thermal Management / Condenser - Gas Cool (Remove and Replace)
Removal
- Recover refrigerant from the vehicle (refer to procedure)
- Remove front aero shield panel (refer to procedure)
- Remove front LH wheel arch liner (refer to procedure)
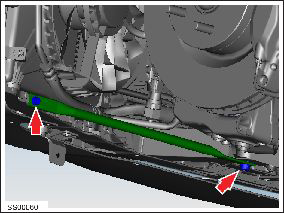
- Remove bolts (x2) securing front bumper panel support bar and
remove (torque 11 Nm).
- Remove nut securing air conditioning pipe to condenser (torque 8
Nm).
.png)
- Disconnect pipe and tie aside.
- Remove nut securing inboard air conditioning link pipe (torque 8 Nm).
- Disconnect pipe from condenser and tie aside.
Caution: Plug pipe connections to prevent ingress of moisture or dirt.
Caution: Lubricate new O-rings with clean refrigerant oil.
.png)
- Disconnect condenser fan motor connector.
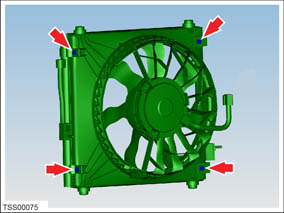
- Remove screws (x4) securing condenser mounting clamps (torque 3
Nm).
.png)
- Release condenser from lower mounting and collect clamps.
- Release from upper mounting and remove condenser assembly from vehicle. Caution: Exercise care when removing condenser to avoid damage.
- Remove bolts (x4) securing fan motor assembly to condenser and
separate from fan assembly (torque 6 Nm).
Installation procedure is the reverse of removal.
Note: Clean the affected areas before installation.
Caution: Lubricate new O-rings with clean refrigerant oil.
READ NEXT:
 Condenser - Sub-cool (Remove and Replace)
Removal
Recover refrigerant from the vehicle (refer to procedure)
Remove front aero shield panel (refer to procedure)
Remove front RH wheel arch liner (refer to procedure)
Remove
Fan - Condenser - LH (Remove and Replace)
Removal
Recover refrigerant from the vehicle (refer to procedure).
Remove the front wheel arch liner (refer to procedure).
Remove the bolts (x2) and remove the front bumper support ba
Fan - Condenser - RH (Remove and Replace)
Removal
Remove the front wheel arch liner (refer to procedure).
If equipped, release the bolts (x2) that secure the front bumper
support bar (torque 11 Nm). Remove the bar from the ve
SEE MORE:
Lamps - Fog - Front - Adjust
Position the vehicle for adjusting the fog lamps:
In a darkened area.
On a level surface.
Perpendicular to a wall that has a matte white
surface. The wall must be at least 3.7 m (12 ft) wide
and 1.87 m (6 ft) high.
The fog lamps are 10 m
200A Fuses - Wall Connector (Remove and Replace) - Removal
Removal
Warning: Only technicians who have been trained in High
Voltage Awareness are permitted to perform this procedure.
Proper personal protective equipment (PPE) and insulating HV
gloves with a minimum rating of class 00 (500V) must be worn any
time a high volta
© 2019-2026 Copyright www.tesms.org
