Tesla Model S: Fan - Condenser - RH (Remove and Replace)
Tesla Model S (2012-2026) Service Manual / Thermal Management / Fan - Condenser - RH (Remove and Replace)
Removal
- Remove the front wheel arch liner (refer to procedure).
- If equipped, release the bolts (x2) that secure the front bumper
support bar (torque 11 Nm). Remove the bar from the vehicle.

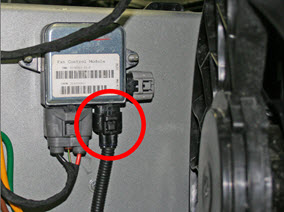
- Disconnect the fan motor electrical connector.
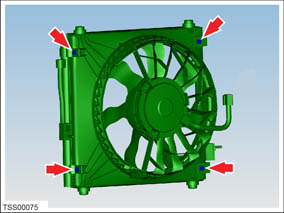
- Remove the bolts that secure the fan to the body:
- Rear Wheel Drive: 4 bolts on the bottom of the fan
- Dual Motor: 4 bolts on top of the fan
- Remove the bolts (x4) that secure the fan assembly to the
condenser (torque 6 Nm).
- Carefully separate the fan housing from the condenser, and remove it from the vehicle.
- Remove any debris collected in the condenser and fan housing.
Installation procedure is the reverse of removal.
Note: Clean the affected areas before installation.
READ NEXT:
 Receiver Dryer and Desiccant (Remove and Replace)
Note: The desiccant bag in the receiver dryer is a
serviceable item and must be replaced every 2 years, whenever the
system is opened to ambient air for an extended time, or when an A/C
sy
Compressor - 1st Generation (Remove and Replace)
Warning: Only technicians who have been trained in High
Voltage Awareness are permitted to perform this procedure. Proper
personal protective equipment (PPE) and insulating HV gloves with a
Compressor - 2nd Generation (Remove and Replace)
Warning: Only technicians who have been trained in High
Voltage Awareness are permitted to perform this procedure. Proper
personal protective equipment (PPE) and insulating HV gloves with a
SEE MORE:
Switch Pack - Driver's (Remove and Replace)
Removal
Remove driver's side door trim (refer to procedure)
Move acoustic pad aside to access door trim.
Caution: Take care not to damage component(s).
Remove screws (x4) securing switch pack assembly t
Mobile Connector to adapter connection hot
Maximum charge rate reduced
Charge current has been reduced because the Mobile Connector has detected a
high temperature at the connection
between the wall plug adapter and the control box.
Make sure the wall plug adapter is fully connected to the Mobile Connector
control box.
After unplugging
© 2019-2026 Copyright www.tesms.org
