Tesla Model S: Condenser - Sub-cool (Remove and Replace)
Tesla Model S (2012-2026) Service Manual / Thermal Management / Condenser - Sub-cool (Remove and Replace)
Removal
- Recover refrigerant from the vehicle (refer to procedure)
- Remove front aero shield panel (refer to procedure)
- Remove front RH wheel arch liner (refer to procedure)
- Remove bolts (x2) securing front bumper panel support bar and
remove (torque 11 Nm).

- Remove nuts (x2) securing two air conditioning pipes (inboard)
to condenser (torque 8 Nm).
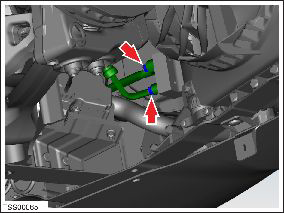
- Release pipes and tie aside. Caution: Plug pipe connections to prevent ingress of moisture or dirt. Caution: Remove and discard O-rings.
- Disconnect condenser fan motor connector.
- Remove screws (x4) securing condenser mounting clamps (torque 3
Nm).
- Release condenser from lower mounting and collect clamps.
- Release condenser from upper mounting and remove assembly from vehicle. Caution: Exercise care when removing condenser to avoid damage.
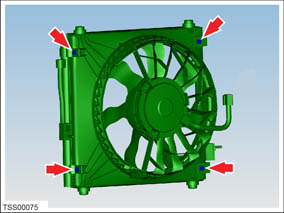
- Remove bolts (x4) securing fan motor assembly to condenser and
separate from fan assembly (torque 6 Nm).
Installation procedure is the reverse of removal.
Note: Clean the affected areas before installation.
Caution: Lubricate new O-rings with clean refrigerant oil.
READ NEXT:
 Fan - Condenser - LH (Remove and Replace)
Removal
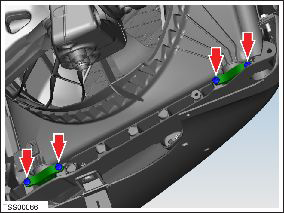
Recover refrigerant from the vehicle (refer to procedure).
Remove the front wheel arch liner (refer to procedure).
Remove the bolts (x2) and remove the front bumper support ba
Fan - Condenser - RH (Remove and Replace)
Removal
Remove the front wheel arch liner (refer to procedure).
If equipped, release the bolts (x2) that secure the front bumper
support bar (torque 11 Nm). Remove the bar from the ve
Receiver Dryer and Desiccant (Remove and Replace)
Note: The desiccant bag in the receiver dryer is a
serviceable item and must be replaced every 2 years, whenever the
system is opened to ambient air for an extended time, or when an A/C
sy
SEE MORE:
Camera Location
Model S is equipped with a rear view camera located
above the rear license plate.
Whenever you shift into Reverse, the touchscreen
displays the view from the camera. Lines show your
driving path based on the position of the steering yoke.
These lines adjust as you move the steering yoke.
Model
Head Supports
The front seats include integrated head supports that
you cannot adjust.
The rear outboard seating positions include an
adjustable head support that can be raised/lowered or
removed. The head support should always be raised and
locked into position (so that the center is aligned with
the cente
© 2019-2026 Copyright www.tesms.org
