Tesla Model S: Coolant Heater - Electric - Battery (Dual Motor) (Remove and Replace)
Warning: Only technicians who have been trained in High Voltage Awareness are permitted to perform this procedure. Proper personal protective equipment (PPE) and insulating HV gloves with a minimum rating of class 00 (500V) must be worn any time a high voltage cable is handled. Refer to Tech Note TN-15-92-003, "High Voltage Awareness Care Points" for additional safety information.
Removal
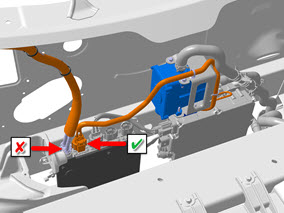
- Disconnect 12V and HV power (refer to procedure).
- Remove the wiper motor (refer to procedure).
- Remove the LH and RH shock tower to bulkhead struts (refer to procedure).
- Release the 2 bolts that secure each fuse box to the front crossmember (torque 5 Nm).
- If the vehicle is equipped with air suspension, release the
bolts (x2) that secure the air reservoir (torque 2.5 Nm). Carefully
set the reservoir in the RH side of the underhood area.
Note: It is not necessary to disconnect the air lines.
.png)
- On top of the forward junction box, release the harness that
leads to the battery coolant heater.
Caution: Do not disconnect the RH most harness from the forward junction box.
- Disconnect the temperature sensor connector from the coolant
hose.
Note: Disconnecting this connector allows the coolant hose to move out of the way more freely when the heater is removed.
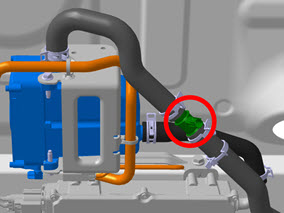
- Clamp and disconnect the 2 coolant hoses.
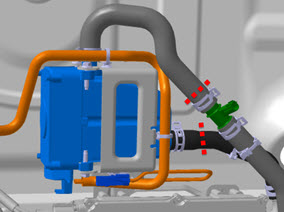
- At the base of the coolant heater bracket, disconnect the
harness that leads to the DCDC converter.
- Slide the harness connector off of the base of the coolant
heater assembly.
.png)
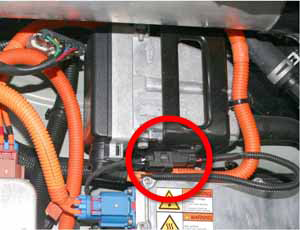
- Release the 2 bolts that secure the coolant heater assembly to
the crossmember (torque 8 Nm).
.png)
Installation procedure is the reverse of removal, except for the following:
- Transfer the coolant hose and bracket to the new part.
- Ensure that all areas are clean and dry before installing the coolant heater.
- When all components have been reinstalled, refill and bleed the cooling system (refer to procedure).
- If necessary, adjust the wipers (refer to procedure).
READ NEXT:
 Battery Coolant Pump 1 (Remove and Replace)
Warning: If the 12V power supply is
disconnected, do not attempt to open any doors with door glass
in closed position. Failure to follow this instruction could
result in door glass shat
Battery Coolant Pump 2 (Remove and Replace)
Warning: If the 12V power supply is disconnected, do
not attempt to open any doors with door glass in closed position.
Failure to follow this instruction could result in door glass
shat
Powertrain Coolant Pump 1 (RWD) (Remove and Replace)
Coolant pump locations:
RWD Model S
Dual Motor Model S
1
Powertrain coolant pump 1
RWD vehicle
2
Battery
SEE MORE:
Displaying Tire Pressures
Display tire pressures on the touchscreen by touching
Controls > Service. The pressure of each tire displays in
the visualization of your Model S, in addition to what
time your tire pressures were last measured. You can
choose whether you want to display tire pressures using
Bar or PSI by to
Door Assembly - Front - LH (Remove and Replace)
Removal
Position vehicle with clear access to door assembly.
Remove sill panel trim (refer to procedure)
Disconnect door harness connectors (x3) from dash wiring
harness.
Support door on stand.
Caution: Take care not to damage component(s).
