Tesla Model S: Powertrain Coolant Pump 1 (RWD) (Remove and Replace)
Tesla Model S (2012-2026) Service Manual / Thermal Management / Powertrain Coolant Pump 1 (RWD) (Remove and Replace)
Coolant pump locations:
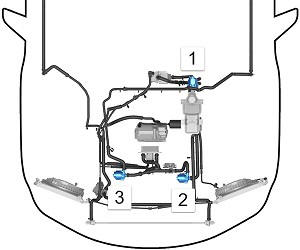
RWD Model S
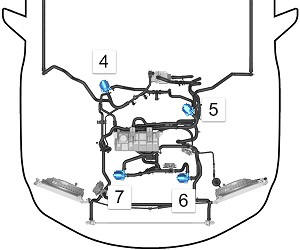
Dual Motor Model S
| 1 | Powertrain coolant pump 1 | RWD vehicle |
| 2 | Battery coolant pump 2 | RWD vehicle |
| 3 | Battery coolant pump 1 | RWD vehicle |
| 4 | Powertrain coolant pump 2 | Dual Motor vehicle |
| 5 | Powertrain coolant pump 1 | Dual Motor vehicle |
| 6 | Battery coolant pump 2 | Dual Motor vehicle |
| 7 | Battery coolant pump 1 | Dual Motor vehicle |
- Remove the coolant reservoir (perform steps 1-12 of the Coolant reservoir remove and install procedure).
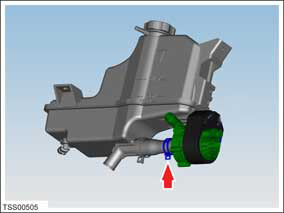
- Position the reservoir and pump assembly over a container to catch any coolant that is spilled in the next step.
- Release the spring clamp that secures the hose from the
reservoir to the coolant pump assembly.
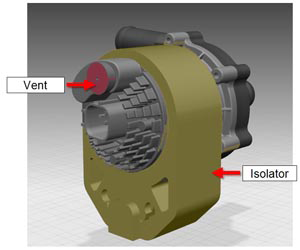
- Use a marker to draw a line on the top of the rubber isolator. Note: This line helps to align the isolator when installing it on the new coolant pump.
- Carefully remove the rubber isolator from the coolant pump.
Caution: Do not damage or remove the push vent.
- Clean any spilled coolant.
Installation procedure is the reverse of removal, except for the following:
- Clean any spilled coolant.
- When placing the rubber isolator over the coolant pump, ensure that the line that was drawn in step 4 of the "Remove" section is positioned on the top of the new coolant pump.
- When all components have been reinstalled, refill and bleed the cooling system (refer to procedure).
READ NEXT:
 Powertrain Coolant Pump 1 (Dual Motor) (Remove and Replace)
Coolant pump locations:
RWD Model S
Dual Motor Model S
1
Powertrain coolant pump 1
RWD vehicle
2
Battery
Powertrain Coolant Pump 2 (Remove and Replace)
Coolant pump locations:
RWD Model S
Dual Motor Model S
1
Powertrain coolant pump 1
RWD vehicle
2
Battery
Active Louver - Center (Remove and Replace)
Removal
Remove the front bumper (refer to procedure).
Remove the radiator (refer to procedure).
Remove the ankle catcher (refer to procedure).
Remove the plastic rivets (x3) that
SEE MORE:
Using Dashcam
Dashcam records footage of your vehicle's surroundings
when the touchscreen is powered on (see Starting and
Powering Off). Dashcam does not record
video when your vehicle is powered off. Use Dashcam to
record driving incidents, such as a collision.
Dashcam requires a properly formatted USB flas
Types of Airbags
Model S has the following types of airbags:
Front airbags: The front airbags are designed to
reduce injuries if larger children or adults are riding in
the front seats. Follow all warnings and instructions
related to seating a child on the front passenger seat
(if permitted in your m
© 2019-2026 Copyright www.tesms.org
