Tesla Model S: Sensor - Radar - Front (Remove and Replace)
Tesla Model S (2012-2026) Service Manual / Electrical / Sensor - Radar - Front (Remove and Replace)
Removal
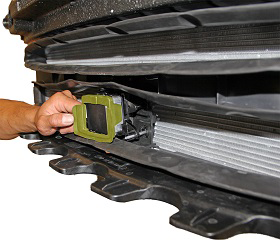
- Remove the front fascia (refer to procedure).
- Remove the radar sensor gasket.
Note: The flaps on each side of the radar sensor gasket are secured by double-sided tape.
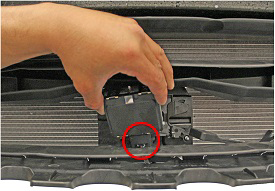
- Use a trim tool or flathead screwdriver to gently pry up the tab
on the top of the inner bracket. Gently release the radar sensor
from the bracket.
Caution: The radar sensor is still connected by a harness. Do not attempt to remove the radar from the vehicle at this time.
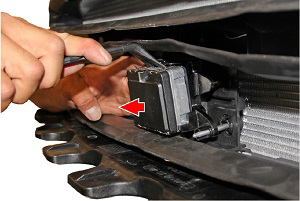
- Disconnect the harness on the bottom of the radar sensor.
Caution: There is little slack in the harness; do not damage the connector.
- Remove the radar sensor.
Installation procedure is the reverse of removal, except for the following:
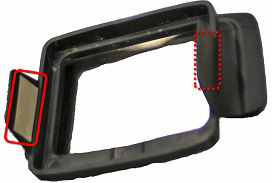
- Replace the double-sided tape on the inboard side of the
flap on each side of the radar sensor gasket before installing.
- Calibrate the front radar sensor (refer to procedure).
READ NEXT:
 Vertical Alignment
Special tools required for this procedure:
Supplier
Part Number
Description
Tesla
1056984-
Horizontal Alignment
Note: Perform the "Vertical Alignment" procedure
before performing the "Horizontal Alignment" procedure.
Connect a laptop with Toolbox 2.0 or later to the vehicle.
Perform the Radar
SEE MORE:
Charge rate reduced - Charge port may be frozen
Try using Defrost Car button in Mobile App
The charge port latch is unable to secure the charge cable in the charge port
inlet, and cold ambient temperature is
detected. If the latch is not engaged, AC charging (for example, charging with a
Mobile Connector or Wall
Connector) will be limited to
Sensor - Motor - Speed (Remove and Replace)
Removal
Remove the mid aero shield (refer to procedure).
Disconnect the speed sensor connector.
Remove the bolt that secures the speed sensor to the end bell
(torque 8 Nm).
Remove the speed sensor from the end b
© 2019-2026 Copyright www.tesms.org
