Tesla Model S: Diffuser Trim - Rear (Remove and Replace)
Tesla Model S (2012-2026) Service Manual / Body / Diffuser Trim - Rear (Remove and Replace)
Removal
- Remove rear diffuser (refer to procedure)
- Remove plastic rivets (x2) and screw (x1) securing diffuser trim
to applique (torque 3 Nm).
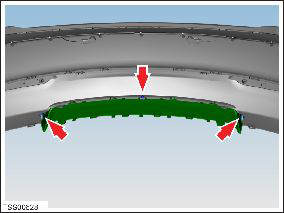
- Remove rear diffuser trim.
Installation procedure is the reverse of removal.
READ NEXT:
 Carrier - Bumper - Front (Remove and Replace)
Warning: If the vehicle has air suspension, activate "Jack"
mode on the touchscreen before raising and supporting the vehicle.
Removal
Recover refrigerant from the vehicle (refer
Strut - Shock Tower to Bulkhead - LH (Remove and Replace)
Removal
Ensure that the wipers are in the off position by rotating the
end of the left-hand steering column lever towards the rear of the
vehicle.
Open the hood to the service pos
Windshield Assembly (Remove and Replace)
Note: Use Dow Betaseal Express or an equivalent fast-curing
glass adhesive to perform this procedure.
Special tool recommended for this procedure:
Supplier
SEE MORE:
Wheels - Vehicle - Set (Remove and Install)
Warning: "Jack mode" must
be activated on vehicles with air suspension before lifting the
vehicle. Failure to do this might lead to suspension damage and
could cause serious personal injury.
Note: Vehicles with air
suspension might need the suspension to be set to "High" or "Very
LF Antenna - Center - Heelboard (Remove and Replace)
Removal
Depress button and fold 60% part of seat back forward.
Lift sufficient heelboard floor covering for access to LF
antenna.
Note: Components have been removed in this graphic
to aid
© 2019-2026 Copyright www.tesms.org
