Tesla Model S: Door Assembly - Front - LH (Remove and Replace)
Tesla Model S (2012-2026) Service Manual / Closures / Door Assembly - Front - LH (Remove and Replace)
Removal
- Position vehicle with clear access to door assembly.
- Remove sill panel trim (refer to procedure)
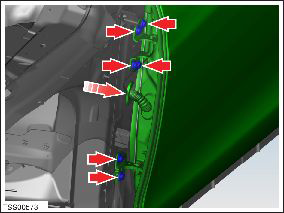
- Disconnect door harness connectors (x3) from dash wiring harness.
- Support door on stand. Caution: Take care not to damage component(s).
- Mark installed positions of hinge to 'A' pillar to aid installation.
- Remove bolts (x6) securing door hinges to body (torque 31 Nm).
Note: Components have been removed in this graphic to aid clarity.
- With assistance release harness grommet from 'A' post.
- Carefully withdraw door wiring harness. Caution: Take care not to damage component(s).
- Remove door and position aside to prevent damage.
Caution: Protect exterior paint surfaces during this procedure.

- Installation procedure is the reverse of removal, except for the following:
- Install door and set hinges to witness marks. Check door alignment, adjust if required.
READ NEXT:
 Latch - Door - Front - LH (Remove and Replace)
Removal
Remove front door trim panel (refer to procedure)
Remove screws (x2) securing door latch assembly to reinforcement
(torque 10 Nm).
Latch - Door - Rear - LH (Remove and Replace)
Removal
Remove the rear seat cushion frame (refer to procedure).
Remove the rear sill trim panel (refer to procedure).
Release the carpet and sound insulation from the rear seat
m
Striker - Door - Front - LH (Remove and Replace)
Removal
Open door.
Remove countersunk screws (x2) securing striker plate to 'B'
pillar (torque 22 Nm).
Note: Note installed position of components before
removal.
SEE MORE:
Multi-Collision Braking
In addition to Automatic Emergency Braking, your
vehicle may apply the brakes to prevent or mitigate a
subsequent impact after an initial collision if airbag
deployment is detected. The brakes may be applied
regardless of driving speed.
Obstacle-Aware Acceleration
Obstacle-Aware Acceleration is
Switch - Seat Height Adjust - Driver's Seat (Remove and Replace)
Removal
Remove driver seat outer side cover (refer to procedure)
Remove screws (x3) securing lumbar adjust switch to cover
(torque 1 Nm).
Remove lumbar adjust switch.
Installation
Insta
© 2019-2026 Copyright www.tesms.org
