Tesla Model S: Latch - Door - Rear - LH (Remove and Replace)
Tesla Model S (2012-2026) Service Manual / Closures / Latch - Door - Rear - LH (Remove and Replace)
Removal
- Remove the rear seat cushion frame (refer to procedure).
- Remove the rear sill trim panel (refer to procedure).
- Release the carpet and sound insulation from the rear seat
mounting cross member to gain access to the latch manual release
lever and cable.
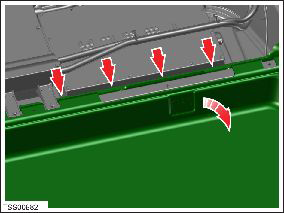
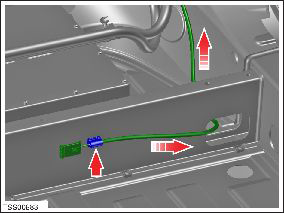
- Release the clip from the cross member and feed the cable
through the opening.
- Remove the screws (x2) that secure the latch to the C-Pillar
(torque 10 Nm).
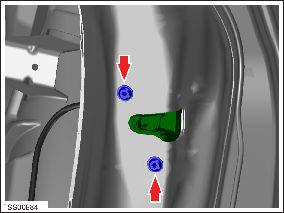
- From inside the vehicle, disconnect the latch wiring, release
the latch from the C-Pillar, then remove it from the opening.

Installation procedure is the reverse of removal.
READ NEXT:
 Striker - Door - Front - LH (Remove and Replace)
Removal
Open door.
Remove countersunk screws (x2) securing striker plate to 'B'
pillar (torque 22 Nm).
Note: Note installed position of components before
removal.
Striker - Door - Rear - LH (Remove and Replace)
Removal
Open door.
Remove countersunk screws (x2) securing striker plate to rear
door (torque 22 Nm).
Note: Note installed position of components before
removal.
Handle - Interior Release - Door - Front - LH (Remove and Replace)
Removal
Remove front door trim panel (refer to procedure)
Release clips and remove door pad finisher.
Caution: Take care not to damage component(s).
SEE MORE:
Bracket - License Plate - Front (Retrofit)
Special tool required for this procedure:
Supplier
Part Number
Description
Tesla
223-28550-TSL
WIHA (TORQUE SCREWDRIVER .1 -
.6NM)
Procedure
Cannot charge - Charge handle temperature high
Check charge handle or charge port for debris
Charging has been interrupted because the Mobile Connector has detected a
high temperature in the charge handle
that connects to your vehicle's charge port.
Make sure the Mobile Connector is fully inserted into your vehicle's charge port
inlet.
You
© 2019-2026 Copyright www.tesms.org
