Tesla Model S: Door Glass - LH - Front - Adjust
Tesla Model S (2012-2026) Service Manual / Closures / Door Glass - LH - Front - Adjust
Removal
- Remove door trim pad (refer to procedure)
- Loosen but do not remove clamp nut securing door glass to
regulator (torque 7.5 Nm). This allows glass to move fore and aft.
Caution: Take care not to damage component(s).
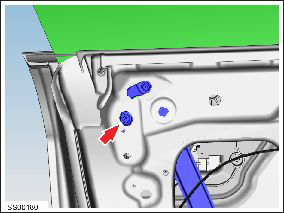
- Remove plugs (x2) from bottom of door covering regulator adjustment nuts
- Loosen nuts (x2) securing regulator adjustment, inboard and
outboard to seal (torque 10 Nm).
- Align door glass to create best fit condition, torque tighten glass clamp and regulator lower adjusters.
- Installation procedure is the reverse of removal, except for the following:
- Cover openings with waterproof adhesive tape.
- Check glass for smoothness of operation and seating to body opening seals, re-adjust if necessary.
READ NEXT:
 Door Glass - LH - Front (Remove and Replace)
Removal
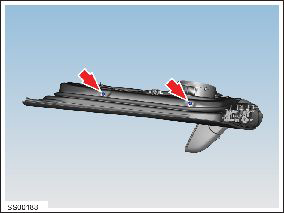
Remove door inner belt glass seal (refer to procedure)
Loosen but do not remove clamp nut securing door glass to
regulator (torque 7.5 Nm).
Caution: Take care not
Door Glass - LH - Rear - Adjust
Removal
Remove door trim pad (refer to procedure)
Partially lower glass for access to glass clamp.
Remove water proof tape for access to adjustment clamp.
Loosen but do not remove
Door Glass - LH - Rear (Remove and Replace)
Removal
Remove door inner belt glass seal (refer to procedure)
Remove adhesive patches (x3) from glass access openings.
Remove screws (x2) securing door access panel (torque 4 Nm).
SEE MORE:
Safety
RST-320
Tesla part number:
1005706-00-C
Description:
Model S Coolant Rapidmate Cover
Model:
Model S
Status:
Distribution
Dashcam and Sentry Mode
NOTE: Depending on market region, vehicle
configuration, options purchased, and software version,
your vehicle may not be equipped with Dashcam or
Sentry Mode or the features may not operate exactly as
described. Please note it is your sole responsibility to
consult and comply with all local re
© 2019-2026 Copyright www.tesms.org
