Tesla Model S: Door Glass - LH - Front (Remove and Replace)
Tesla Model S (2012-2026) Service Manual / Closures / Door Glass - LH - Front (Remove and Replace)
Removal
- Remove door inner belt glass seal (refer to procedure)
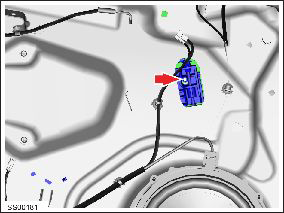
- Loosen but do not remove clamp nut securing door glass to
regulator (torque 7.5 Nm).
Caution: Take care not to damage component(s).
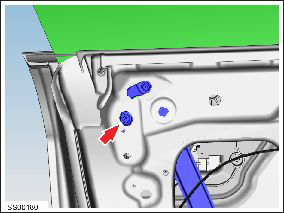
- Lower door glass and align with opening in door panel.
- Remove adhesive patch from glass retainer access opening.
- Using a suitable tool, depress clip and pull leading edge of
glass vertically to release from regulator clip.
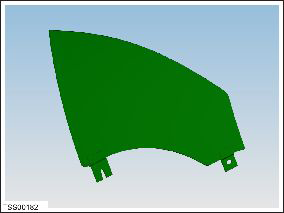
- Remove door glass.
- Installation procedure is the reverse of removal, except for the following:
- Cover openings with waterproof adhesive tape.
- Check window alignment and adjust if necessary.
READ NEXT:
 Door Glass - LH - Rear - Adjust
Removal
Remove door trim pad (refer to procedure)
Partially lower glass for access to glass clamp.
Remove water proof tape for access to adjustment clamp.
Loosen but do not remove
Door Glass - LH - Rear (Remove and Replace)
Removal
Remove door inner belt glass seal (refer to procedure)
Remove adhesive patches (x3) from glass access openings.
Remove screws (x2) securing door access panel (torque 4 Nm).
Door Glass - RH - Rear - Adjust
Removal
Remove door trim pad (refer to procedure)
Partially lower glass for access to glass clamp.
Remove water proof tape for access to adjustment clamp.
Loosen but do not remove
SEE MORE:
Forward Collision Warning
Model S monitors the area in front of it for the presence
of an object such as a vehicle, motorcycle, bicycle, or
pedestrian. If a collision is considered likely unless you
take immediate corrective action, Forward Collision
Warning is designed to sound a chime and highlight the
vehicle in fron
Charge Port - 3 Phase (Remove and Replace)
Note: This procedure describes how to remove and install
the 3 phase charge port. If the vehicle is equipped with a single
phase charge port, refer to procedure 44012202 (refer to procedure).
Warning: Only technicians who have been trained in High
Voltage Awareness are permitted to p
© 2019-2026 Copyright www.tesms.org
