Tesla Model S: Position Switch Harness - Door Handle (Remove)
Tesla Model S (2012-2026) Service Manual / Closures / Position Switch Harness - Door Handle (Remove and Replace) / Position Switch Harness - Door Handle (Remove)
Note: This procedure is valid for all 2nd generation door handles.
Special tools required for this procedure:
| Supplier | Part Number | Description |
| Bosch | 223-28550-TSL | Wiha (Torque Screwdriver .1 - .6Nm) |
- Remove the exterior door handle.
- Front door handle, (refer to procedure).
- Rear door handle, (refer to procedure).
- Remove and discard the door handle cover.
- Cut the cable ties that secure the wires to the door handle.
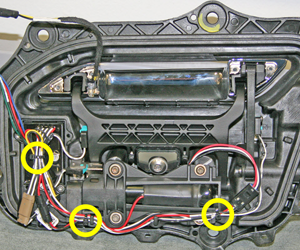
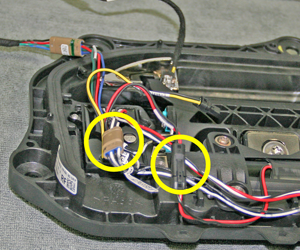
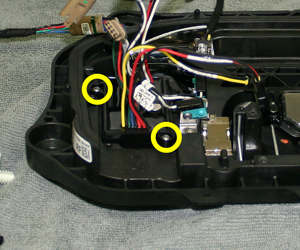
- Disconnect the electrical connectors (x2):
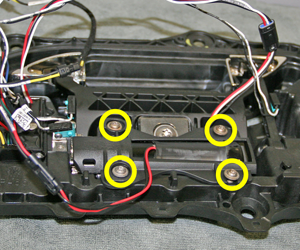
- Remove and discard the screws (x4) that secure the motor (torque
0.3 Nm). Remove the motor from the handle.
Note: Rear door handles only have 3 screws.
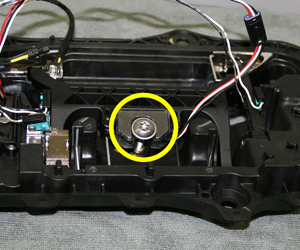
- Remove the adjustment screw from the door handle.
- Remove and discard the screws (x2) that secure the door handle
module (torque 0.3 Nm).
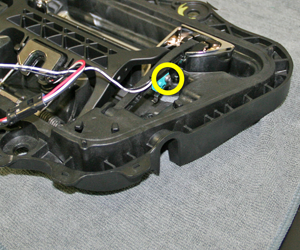
- Move the module out of the way, then release the screw that
secures the rear microswitch (torque 0.3 Nm).
- Release the screw that secures the front microswitch (0.3 Nm).
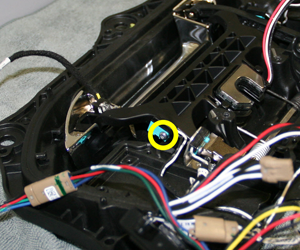
- Remove the microswitch harness from the door handle.
READ NEXT:
 Position Switch Harness - Door Handle (Replace)
Installation
Install the microswitch harness.
Reinstall all components other than the door backing. Leave the
harnesses loose.
Note: If performing this procedure o
Door Glass - LH - Front - Adjust
Removal
Remove door trim pad (refer to procedure)
Loosen but do not remove clamp nut securing door glass to
regulator (torque 7.5 Nm). This allows glass to move fore and aft.
Cauti
Door Glass - LH - Front (Remove and Replace)
Removal
Remove door inner belt glass seal (refer to procedure)
Loosen but do not remove clamp nut securing door glass to
regulator (torque 7.5 Nm).
Caution: Take care not
SEE MORE:
Rails - Diffuser Tray Rear - LH (Remove and Replace)
Warning: If the vehicle has air suspension, activate "Jack"
mode on the touchscreen before raising and supporting the vehicle.
Removal
Raise and support the vehicle (refer to procedure)
Warning: Do not work on an incorrectly supported
vehicle.
Braking Systems
WARNING: Properly functioning braking systems
are critical to ensure safety. If you experience a
problem with the brake pedal, brake calipers, or
any component of a Model S braking system,
contact Tesla immediately.
Model S has an anti-lock braking system (ABS) that
prevents the wheels f
© 2019-2026 Copyright www.tesms.org
