Tesla Model S: Handle - Exterior Release - Door - Front - LH (Remove and Replace)
Tesla Model S (2012-2026) Service Manual / Closures / Handle - Exterior Release - Door - Front - LH (Remove and Replace)
Removal
- Remove regulator assembly (refer to procedure)
- Make sure exterior release handle is fully retracted.
- Disconnect handle harness connector.
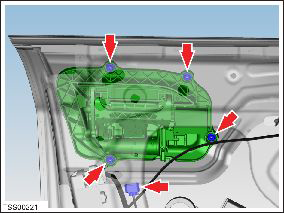
- Remove nuts (x4) securing door release assembly to reinforcement (torque 9 Nm).
- Carefully release door handle assembly from door outer panel.
Caution: Take care not to damage component(s).
Caution: Protect exterior paint surfaces during this procedure.
- Remove exterior release handle assembly from door.
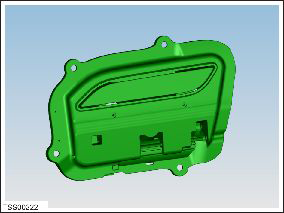
- Remove door handle rear seal.
- Remove screws (x4) securing handle grip backplate and remove
(torque 2 Nm).
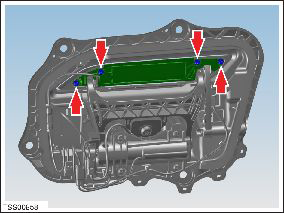
- Release LED from door grip.
- Release door grip from fork and remove.

Installation is the reverse of removal, except for the following:
- Install the grip and back plate on the new handle assembly before reinstallation.
-
Use Toolbox to update or redeploy the firmware:
- If the vehicle is not running the latest firmware, run the "Vehicle Firmware Update" procedure.
- If the vehicle is running the latest firmware, run the "Firmware Redeploy" procedure.
- After installation, check operation of replacement door handle.
READ NEXT:
 Handle - Exterior Release - Door - Rear - LH (Remove and Replace)
Removal
Remove regulator assembly (refer to procedure)
Make sure exterior release handle is fully retracted.
Disconnect handle harness connector.
Remove nuts (x4) securing door re
Grip - Door - Exterior Handle - Front - LH (Remove and Replace)
Removal
Remove grip backplate (refer to procedure) .
Release LED from door grip.
Release door grip from fork and remove.
Grip - Door - Exterior Handle - Rear - LH (Remove and Replace)
Removal
Remove grip backplate (refer to procedure)
Release LED from door grip.
Remove door grip from fork.
Ins
SEE MORE:
Troubleshooting
Charging does not start. The green "Ready" light in the software
application is dimmed.
Check that the HV power supply is plugged in and turned
on.
Check the connections at the rear of the
charger/interface control box.
Discharging does not start.
Auto-Raising Locations
Whenever you raise the suspension to High or Very
High, the location is automatically saved. By saving the
location, you do not need to manually raise the
suspension every time you arrive at a frequently-used
location where you have previously raised the
suspension. When you return to the saved
© 2019-2026 Copyright www.tesms.org
