Tesla Model S: Module - Steering Column Control (Remove and Replace)
Tesla Model S (2012-2026) Service Manual / Electrical / Module - Steering Column Control (Remove and Replace)
Removal
- Ensure that the front road wheels are in the straight ahead position.
- Fully extend the column and centralize tilt.
- Remove the steering wheel (refer to procedure).
- Carefully rock the controller module 2-3 degrees back and forth
to break the bond between the module and the steering column.
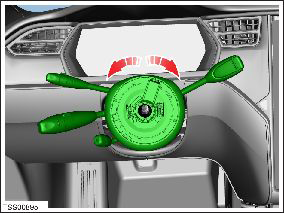
- Remove the steering controller module from the shaft.
- Remove and discard the airbag harness retaining clip from the
steering column module harness connector.
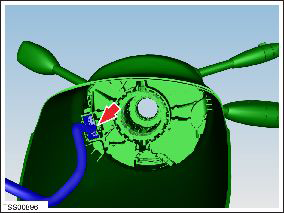
- Disconnect the steering column module harness connector.
- Remove the steering control module from the vehicle.
Note: Clean the affected areas before installation.
InstallationInstallation procedure is the reverse of removal, except for the following:
- Install a new airbag harness retaining clip.
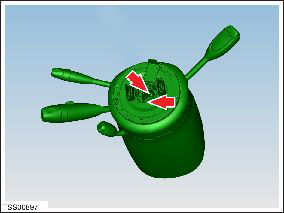
- Press up on the red tab to adjust the position of the
plastic housing. Rotate the housing until the clocksping cable
is between the arrows and the tab returns to the locked
position.
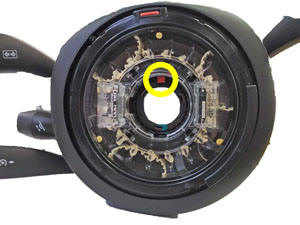
- Ensure that the pegs (x2) align to the slots in the steering
column.
Caution: Take care not to damage component(s).
- Use the Toolbox Power Steering (EPAS) Control panel to reflash the steering module
READ NEXT:
 Module - Thermal Controller (Remove and Replace)
Removal
Remove IP carrier (refer to procedure)
Remove screws (x4) securing thermal control module to HVAC unit.
Position module for access and disconnect wiring harness
connec
Module - HVAC Controller - RCCM (Remove and Replace)
Removal
Remove the IP carrier (refer to procedure).
Disconnect the HVAC harness connector from the Remote Climate
Control Module (RCCM).
Remove the screws (x4) that secure the RCC
Module - Seat Heater - Driver's Seat (Remove and Replace)
Removal
Open door.
Power seat height adjust fully upwards for access.
Disconnect seat heater module connectors and harnesses (x2).
SEE MORE:
Bluetooth Compatibility
You can use your Bluetooth-capable
phone
hands-free in Model S provided your phone
is within operating range. Although
Bluetooth typically supports wireless
communication over distances of up to
approximately 30 feet (nine meters),
performance can vary based on the phone
you are using.
Befor
Cover - Seat back - 2nd Row Seat - RH (Remove and Replace)
Removal
Remove pivot lock (refer to procedure)
Release and remove latch cover from seat back.
Carefully release cover from seat back frame.
Remove cover and foam assembly from frame.
© 2019-2026 Copyright www.tesms.org
