Tesla Model S: Headlight - Adjust - North America
Tesla Model S (2012-2026) Service Manual / Electrical / Headlight - Adjust - North America
North America (SAE)
- Prepare a work area for adjusting the headlights:
- The area is darkened.
- The ground is flat and level.
- There is a wall with a white matte surface. Note: The wall should be at least 6 ft (1.8 m) high and 12 ft (3.7 m) wide.
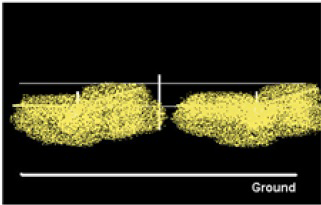
- Put a piece of tape on the wall 27.5 in (698 mm) from the ground to indicate where the beam should show.
- Measure 25 ft (7.62 m) away from the wall and put a piece of tape on the ground to indicate where the vehicle should be parked.
- Park the vehicle perpendicular to the wall so that the front fasica is flush with the tape that was placed on the ground in the previous step.
- Air suspension vehicles: Set the suspension height to "Standard".
- Ensure that all 4 tires are inflated to their recomended settings. Refer to General Information > Technical Data > Tire pressures.
- Ensure that the vehicle is level by rocking it from side to side.
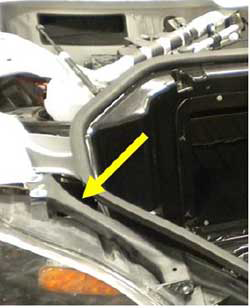
- Remove the LH and RH underhood aprons (refer to procedure).
- Use the touchscreen to turn on the low beam headlights.
- Cover the RH headlight; ensure that all light from the right headlight is blocked.
- Locate the headlight adjuster.
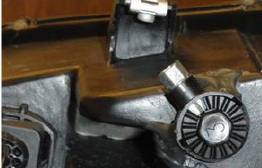
- Adjust the headlight so that the distance between the ground and
the top right part of the beam on the wall is 27.5 in (698 mm).
- Repeat steps 10-12 by covering the LH headlight and adjusting the RH headlight.
- Reinstall all components that were removed for access.
- Use the touchscreen to put the headlight back to "Auto" mode.
READ NEXT:
 Headlight - Adjust - Europe
Europe (ECE)
Position the vehicle for adjusting the headlights:
The vehicle is in a darkened area.
The vehicle is on a level surface.
The vehicle is perpendic
Headlight Assembly - LH (Remove and Replace)
Removal
Remove front fascia for access (refer to procedure)
Disconnect headlight connectors (x2).
Remove bolts (x4) sec
Tail Light Assembly (Non-Motorized Charge Port) - LH (Remove and Replace)
Special tool required for this procedure:
Supplier
Part Number
Description
Tesla
1054190-0
SEE MORE:
Condenser - Gas Cool (Remove and Replace)
Removal
Recover refrigerant from the vehicle (refer to procedure)
Remove front aero shield panel (refer to procedure)
Remove front LH wheel arch liner (refer to procedure)
Remove bolts (x2) securing front bumper panel support bar and
remove (torque 11 Nm).
Removing the Maintenance Panel
To check fluid levels, remove the maintenance panel:
1. Open the hood.
2. Pull the maintenance panel upward to release the
clips that hold it in place.
CAUTION: The maintenance panel protects the
front trunk from water. When re-attaching, make
sure it is fully seated.
Checking Battery Cool
© 2019-2026 Copyright www.tesms.org
