Tesla Model S: Hinge - Hood - LH (Remove and Replace)
Tesla Model S (2012-2026) Service Manual / Closures / Hinge - Hood - LH (Remove and Replace)
Removal
- Remove the hood assembly (refer to procedure).
- Mark the installed position of the hinge to the hood.
- Remove the nuts (x2 or x3) that secure the LH hinge to the hood
(torque 24 Nm).
Caution: Protect exterior paint work from possible damage during this procedure.
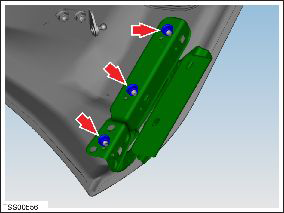
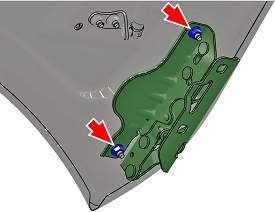
- Remove LH hood hinge.
Installation procedure is the reverse of removal, except for the following:
Note: Clean the affected areas before installation.
Caution: Replace all nylon-insert locknuts.
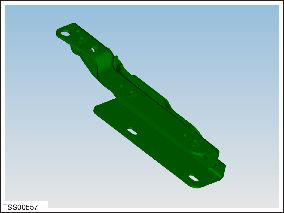
- Install the hood hinge to the previously marked position.
READ NEXT:
 Cable - Latch - Hood (RWD) (Remove and Replace)
Removal
Remove the hood latch cover (refer to procedure).
Release the hood release cable hook from the latch assembly.
Cable - Latch - Hood - LH (Dual Motor) (Remove and Replace)
Removal
Remove the underhood storage unit (refer to procedure).
Release the rear cable from the latch assembly.
Note: If performing this procedure on the
RH side, rele
Actuator - Latch - Hood - LH (Dual Motor) (Remove and Replace)
Removal
Remove the ankle catcher (refer to procedure).
Remove the LH and RH condenser ducts (refer to procedure).
Remove the plastic rivets (x3) that secure the center louver
asse
SEE MORE:
Master Charger - RH - 1st Generation (Remove and Replace)
Note: This procedure describes how to remove and install
the 1st generation master charger. If the vehicle is equipped with a
2nd generation master charger, refer to procedure 44102202 (refer to
procedure).
Warning: Only technicians who have been trained in High
Voltage Awarenes
Speaker - Rear - LH/RH (Remove and Replace)
Removal
Open tailgate to suitable working height.
Carefully release speaker cover clips (x9) from tailgate.
Caution: Take care not to damage component(s).
Remove speaker covers and position aside.
© 2019-2026 Copyright www.tesms.org
