Tesla Model S: Horn - 2nd Generation (Remove and Replace)
Tesla Model S (2012-2026) Service Manual / Electrical / Horn - 2nd Generation (Remove and Replace)
Removal
- Remove the active center louver assembly (refer to procedure).
- Place the active center louver assembly on a soft, clean surface with the front of the duct assembly facing down.
- Release the bolt that secures the horn bracket to the active
center louver assembly assembly (torque 5 Nm).
Note: Do not release the nut that secure the horn to the bracket.
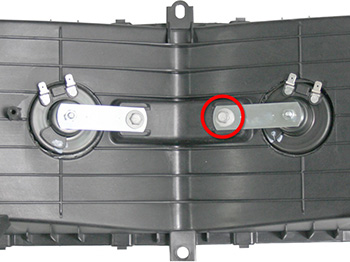
- Remove the horn and bracket by maneuvering them out through the circular hole in the radiator duct assembly.
Installation procedure is the reverse of removal.
READ NEXT:
 Wiper Motor Assembly (Remove and Replace)
Removal
Ensure that the wipers are in the off position by rotating the
end of the left-hand steering column lever toward you.
Open the hood to the service position.
Remove the cow
Pump - Windshield Washer Reservoir (Remove and Replace)
Removal
Remove the front LH upper wheel arch liner (refer to procedure).
Position a container to collect any spillage.
Disconnect the washer pump connector.
Release the washer
Reservoir - Windshield Washer (Remove and Replace)
Removal
Remove the rear center underhood apron (refer to procedure).
Remove the plastic rivet that secures the reservoir neck to the
suspension shock tower.
SEE MORE:
Subframe Assembly - Rear (Remove and Replace)
Removal
Remove the rear drive unit:
Small drive unit:
Refer to procedure.
Large drive unit:
Refer to procedure.
Remove the rear sway bar
(refer to procedure).
If the vehicle is equipped with air suspension,
remove
Finisher - Liftgate - Rear Window - Lower (Remove and Replace)
Removal
Inspect the latch cover. If it is a separate trim part, remove
it with a trim tool. If is not a separate part, proceed to step 2.
Remove the liftgate upper trim finisher (refer to procedure).
Remove the
© 2019-2026 Copyright www.tesms.org
