Tesla Model S: Pump - Windshield Washer Reservoir (Remove and Replace)
Tesla Model S (2012-2026) Service Manual / Electrical / Pump - Windshield Washer Reservoir (Remove and Replace)
Removal
- Remove the front LH upper wheel arch liner (refer to procedure).
- Position a container to collect any spillage.
- Disconnect the washer pump connector.
- Release the washer tube from the pump and drain any fluid from
the reservoir.
Note: Place suitable absorbent material around the affected area to absorb any possible fluid spillage.
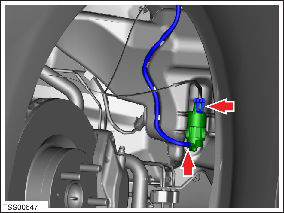
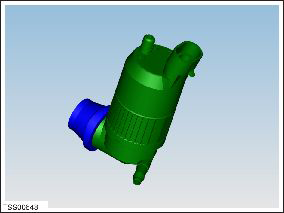
- Remove the pump from the washer reservoir.
Note: Inspect the O-ring for damage and replace if necessary.
Installation procedure is the reverse of removal.
READ NEXT:
 Reservoir - Windshield Washer (Remove and Replace)
Removal
Remove the rear center underhood apron (refer to procedure).
Remove the plastic rivet that secures the reservoir neck to the
suspension shock tower.
Nozzle - Windshield Washer Jet (Remove and Replace)
Removal
Remove the hood acoustic panel (refer to procedure).
Disconnect the washer jet pipe from the T-piece.
Release t
Sensor - Level - Windshield Washer Reservoir (Remove and Replace)
Removal
Remove the front LH upper wheel arch liner (refer to procedure).
Position a container to collect any spillage.
Disconnect the level sensor connector.
SEE MORE:
Passive Locking and Unlocking
Locking and unlocking Model S with your key fob is
conveniently hands-free. Although you must be carrying
a paired key fob, there is no need to use it. Model S has
sensors around the vehicle that can recognize the
presence of a key fob within a range of approximately
six feet (two meters). Ther
Topping Up Windshield Washer
Fluid
The only reservoir into which you can add fluid is the
windshield washer fluid reservoir, which is located
behind the front trunk. When the level is low, a message
displays on the instrument panel.
To top up the washer fluid:
1. Open the hood.
2. Clean around the filler cap before opening it to
© 2019-2026 Copyright www.tesms.org
