Tesla Model S: Hub - Rear - LH (Remove and Replace)
Special tool(s) required for this procedure:
| Supplier | Part Number | Description |
| Tesla | 1062500-00-A | Magnetic Field Viewing Card |
| Tesla | 1082171-00-A | S-hook |
Removal
- Position the vehicle in preparation for raising it, but keep the vehicle at ground level at this time.
- Loosen the lug nuts on the LH rear wheel.
- Remove the wheel center cap.
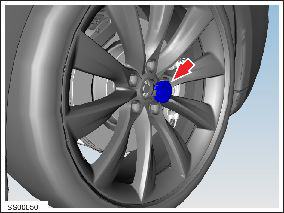
- Remove the hub nut (torque 245 Nm).
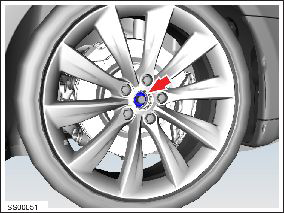
- Remove the wedge-lock washer.
- Put the vehicle in "Tow" mode.
- Remove the rear wheel arch liner (refer to procedure).
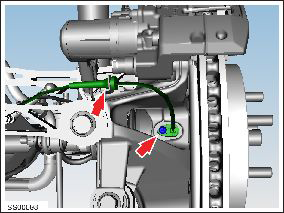
- Remove the bolts (x2) that secure the brake caliper to the
knuckle (torque 120 Nm).
.png)
- Release the caliper and use the S-hook to support it. Caution: To avoid damage to the brake line, the brake caliper must be supported at all times.
- Remove the screw that secures the wheel speed sensor to the
knuckle (torque 8 Nm).
- Release the wheel speed sensor from the knuckle and tie it aside. Caution: Take care not to damage component(s).
- Remove the parking brake caliper (refer to procedure).
- Remove the screw that secures the brake rotor to the hub, then
remove the brake rotor (torque 17 Nm).
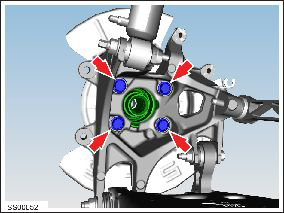
- Remove the bolts (x4) that secure the hub to the knuckle (torque
90 Nm).
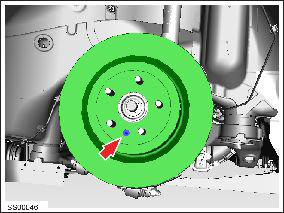
Note: The hub and knuckle assembly is shown removed from the vehicle to aid clarity.
- Release the driveshaft from the hub, and remove the hub from the
knuckle. Place the hub on a non-magnetic surface.
Caution: A magnetic field from a pick-up tool or magnetic parts tray could permanently damage the magnetic pattern on the hub/bearing tone ring.

Installation procedure is the reverse of removal, except for the following:
Note: Clean the affected areas before installation.
- Clean the mating faces of the hub and disc.
- Use the magnetic field viewing card to ensure that the magnetic field on the tone ring is not damaged.
- After connecting the electric parking brake caliper harness, wrap the connector seam with electrical tape to prevent dirt ingress.
- Pump the brake pedal at least 5 times to seat the pads against the brake rotors.
Warning: Always check that the brake pads are seated correctly before driving the vehicle.
READ NEXT:
 Control Arm Assembly - Rear - Lower - LH (Remove and Replace)
Warning: If the vehicle has air suspension, activate "Jack"
mode on the touchscreen before raising and supporting the vehicle.
Removal
Loosen the front LH lug nuts.
Raise and
Link - Suspension - Rear - Upper - LH (Remove and Replace)
Warning: If the vehicle has air suspension, activate "Jack"
mode on the touchscreen before raising and supporting the vehicle.
Removal
Remove the wheel (refer to procedure).
Toe Link Assembly - Rear - LH (Remove and Replace)
Warning: If the vehicle has air suspension, activate "Jack"
mode on the touchscreen before raising and supporting the vehicle.
Removal
Raise and support the vehicle (refer to pro
SEE MORE:
Handle - Exterior Release - Door - Rear - LH (Remove and Replace)
Removal
Remove regulator assembly (refer to procedure)
Make sure exterior release handle is fully retracted.
Disconnect handle harness connector.
Remove nuts (x4) securing door release assembly to reinforcement
(torque 9 Nm).
Carefully release door handle assembly from d
Module - Park Assist (Remove and Replace)
Removal
Remove the LH side rear trunk trim for access (refer to
procedure).
Disconnect the harness connections (x3) from the module.
Caution: Mark the harnesses so that they are
reinstalled properly.
