Tesla Model S: Control Arm Assembly - Rear - Lower - LH (Remove and Replace)
Tesla Model S (2012-2026) Service Manual / Suspension / Control Arm Assembly - Rear - Lower - LH (Remove and Replace)
Warning: If the vehicle has air suspension, activate "Jack" mode on the touchscreen before raising and supporting the vehicle.
Removal
- Loosen the front LH lug nuts.
- Raise and support the vehicle (refer to procedure)
- Remove road wheel (refer to procedure)
- Remove mid aero shield (refer to procedure)
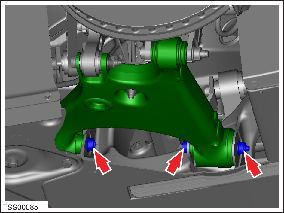
- Remove nut and bolt securing lower control arm to integral link (torque 130 Nm).
- Remove nut securing sway bar link to lower control arm (torque 70 Nm). Caution: To prevent ball joint damage, always hold the ball joint pin with a wrench while loosening or tightening the lock nut.
- Remove nut and bolt (x2) securing lower control arm to subframe
(torque 115 Nm).
- Support weight of hub and rotor. Caution: Take care not to damage component(s).
- Remove nut and bolt securing lower control arm to knuckle (torque 190 Nm).
- Release arm from suspension knuckle and remove lower control arm.
- Installation procedure is the reverse of removal, except for the following: Note: Clean the affected areas before installation. Caution: Only fully tighten suspension nuts and bolts when the vehicle is on a 4-post lift and the suspension is in the ride height position.
- Transfer vehicle to a 4 post lift (refer to procedure)
- Perform a four wheel alignment check (refer to procedure)
READ NEXT:
 Link - Suspension - Rear - Upper - LH (Remove and Replace)
Warning: If the vehicle has air suspension, activate "Jack"
mode on the touchscreen before raising and supporting the vehicle.
Removal
Remove the wheel (refer to procedure).
Toe Link Assembly - Rear - LH (Remove and Replace)
Warning: If the vehicle has air suspension, activate "Jack"
mode on the touchscreen before raising and supporting the vehicle.
Removal
Raise and support the vehicle (refer to pro
Drop Link - Sway Bar - Rear - LH (Remove and Replace)
Removal
Remove the road wheel (refer to procedure).
Remove the nut that secures the sway bar drop link to the lower
control arm (torque 70 Nm).
Caution: To p
SEE MORE:
Air bag - Front Passenger's (Remove and Replace)
Note: Removing the passenger's front airbag destroys the
instrument panel top pad.
Removal
Remove the top pad (refer to procedure)
Note: The top pad is not reused in this procedure.
Remove the passenger airbag from the instrument panel top p
Seal - Sliding Glass - Panoramic Roof (Remove and Replace)
Removal
Remove the sliding roof glass (refer to procedure) .
Release the rear ends of the main seal from beneath the stop
bumper seal.
Carefully release the sealant bond from the body.
Remove the seal.
© 2019-2026 Copyright www.tesms.org
