Tesla Model S: Link - Suspension - Rear - Upper - LH (Remove and Replace)
Tesla Model S (2012-2026) Service Manual / Suspension / Link - Suspension - Rear - Upper - LH (Remove and Replace)
Warning: If the vehicle has air suspension, activate "Jack" mode on the touchscreen before raising and supporting the vehicle.
Removal
- Remove the wheel (refer to procedure).
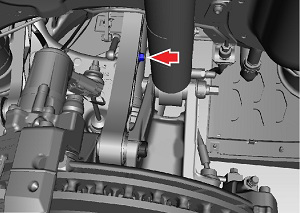
- Remove the nut that secures the ride height sensor link and
release it from the upper suspension link (torque 7 Nm).
Caution: To prevent ball joint damage, always hold the ball joint pin with a wrench while loosening or tightening the lock nut.
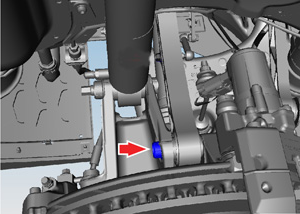
- Remove the bolt that secures the upper suspension link to the
knuckle (torque 140 Nm).
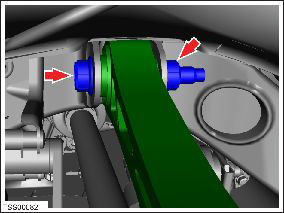
- Remove the nut and bolt that secure the upper suspension link to
the subframe (torque 130 Nm).
- Remove the upper suspension link from the vehicle.
Installation procedure is the reverse of removal, except for the following:
Note: Clean the affected areas before installation.
Caution: Replace all nylon-insert locknuts.
Caution: Only fully tighten suspension bushing bolts when the vehicle is in ride height position.
- If the vehicle is equipped with air suspension, perform a ride height calibration (refer to procedure).
- Perform a four wheel alignment check (refer to procedure).
READ NEXT:
 Toe Link Assembly - Rear - LH (Remove and Replace)
Warning: If the vehicle has air suspension, activate "Jack"
mode on the touchscreen before raising and supporting the vehicle.
Removal
Raise and support the vehicle (refer to pro
Drop Link - Sway Bar - Rear - LH (Remove and Replace)
Removal
Remove the road wheel (refer to procedure).
Remove the nut that secures the sway bar drop link to the lower
control arm (torque 70 Nm).
Caution: To p
Integral Link - Rear - LH (Remove and Replace)
Warning: If the vehicle has air suspension, activate "Jack"
mode on the touchscreen before raising and supporting the vehicle.
Removal
Remove road wheel (refer to procedure)
SEE MORE:
Module - Liftgate Control (Remove and Replace)
Removal
Remove the RH side trunk trim (refer to procedure).
Disconnect the harness connectors (x2) from the electric park
brake (EPB) module.
Disconnect the harness connections (x2) from the liftgate
control mod
Troubleshooting
Charging does not start. The green "Ready" light in the software
application is dimmed.
Check that the HV power supply is plugged in and turned
on.
Check the connections at the rear of the
charger/interface control box.
Discharging does not start.
© 2019-2026 Copyright www.tesms.org
