Tesla Model S: HVAC Assembly (Remove and Replace)
Tesla Model S (2012-2026) Service Manual / Thermal Management / HVAC Assembly (Remove and Replace)
Removal
- Remove cross car beam (refer to procedure).
- Recover refrigerant from AC system (refer to procedure).
- Disconnect AC connection to HVAC, discard 'O' rings (torque 22
Nm).

- Remove screws (x2) securing bulkhead TXV valve to HVAC (torque 6 Nm).
- Disconnect TXV harness connector.
- Remove and discard 'O' ring. Caution: Lubricate new O-rings with clean refrigerant oil.
- Disconnect HVAC harness connectors (x10).
- LHD vehicles only: Remove the body controller (BCM) (refer to procedure).
- Remove bolts (x7) securing HVAC to bulkhead (torque 6 Nm).

- Disconnect HVAC drain tube.
- Remove plastic rivets (x3) securing front LH shock tower cover
to body. Release cover and remove.
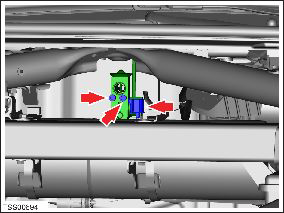
.png)
- Working from above, disconnect harness connector from DC-DC
module.
Note: Components have been removed in this graphic to aid clarity.

- Attach a tether to the PTC heater harness.
- With assistance carefully release PTC harness from bulkhead and withdraw into footwell.
- Disconnect tether from harness connector. Note: Do not withdraw tether from bulkhead.
- Carefully remove HVAC and place on padded surface to prevent damage.
Caution: Plug pipe connections to prevent ingress of moisture or dirt.
Installation- Installation procedure is the reverse of removal. Caution: Lubricate new O-rings with clean refrigerant oil.
- With assistance carefully pull DC-DC harness through bulkhead. Follow route left by tether, check surrounding components are not compromised. Cable tie and clip harness and hoses to avoid rubbing.
- Disconnect tether from harness connector.
READ NEXT:
 Actuator - Inlet (Remove and Replace)
Removal
Remove glove box assembly (refer to procedure)
Disconnect actuator harness connector.
Remove screws (x3) securing recirculation actuator to HVAC
assembly (torque 1 Nm).
Actuator - Driver's Temperature (Remove and Replace)
Removal
Remove IP carrier (refer to procedure)
Disconnect duct temperature sensor harness connector.
Remove screw securing duct to HVAC assembly and position duct
aside (torque 1
Actuator - Mode (Remove and Replace)
Removal
Remove IP carrier (refer to procedure)
Disconnect duct temperature sensor harness connector.
Remove screw securing duct to HVAC assembly and position duct
aside (torque 1
SEE MORE:
Seat Assembly - 3rd Row (Replace)
Installation
Installation procedure is the reverse of removal, except for the
following:
Before installing the mounting bolts, ensure that the
mounting bracket holes are aligned with the threaded nut inserts
behind the body panel. If the nut insert does not al
Autopilot Features
NOTE: Depending on market region, vehicle
configuration, options purchased, and software version,
your vehicle may not be equipped with all features listed
below, or a feature may not operate exactly as
described.
These Autopilot convenience features are designed to
reduce driver workload:
Tr
© 2019-2026 Copyright www.tesms.org
