Tesla Model S: Actuator - Inlet (Remove and Replace)
Tesla Model S (2012-2026) Service Manual / Thermal Management / Actuator - Inlet (Remove and Replace)
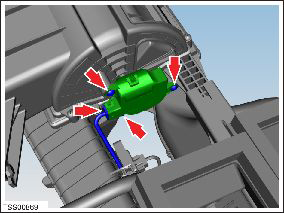
Removal
- Remove glove box assembly (refer to procedure)
- Disconnect actuator harness connector.
- Remove screws (x3) securing recirculation actuator to HVAC assembly (torque 1 Nm).
- Remove recirculation actuator.
Caution: Take care not to damage component(s).
Installation procedure is the reverse of removal.
READ NEXT:
 Actuator - Driver's Temperature (Remove and Replace)
Removal
Remove IP carrier (refer to procedure)
Disconnect duct temperature sensor harness connector.
Remove screw securing duct to HVAC assembly and position duct
aside (torque 1
Actuator - Mode (Remove and Replace)
Removal
Remove IP carrier (refer to procedure)
Disconnect duct temperature sensor harness connector.
Remove screw securing duct to HVAC assembly and position duct
aside (torque 1
Actuator - Front Passenger's Temperature (Remove and Replace)
Removal
Remove glove box assembly (refer to procedure)
Disconnect duct temperature sensor harness connector.
Remove screw securing duct to HVAC assembly, release from spigot
and p
SEE MORE:
Tips to Maximize Range
You can maximize your driving range using the same
driving habits you use to conserve fuel in a gasoline-
powered vehicle. To achieve maximum range:
Slow down your driving and avoid frequent and rapid
acceleration. Consider using Chill Mode (touch
Controls > Pedals & Steering > Acce
Hood Assembly (Remove and Install)
Removal
Remove the LH underhood apron for access (refer to procedure).
Remove the RH underhood apron for access.
Mark the installed position of the hood hinges to the body.
With assistance, support the weight of the hood.
Release the clips (x2) and disconnect the gas
© 2019-2026 Copyright www.tesms.org
