Tesla Model S: Integral Link - Rear - LH (Remove and Replace)
Tesla Model S (2012-2026) Service Manual / Suspension / Integral Link - Rear - LH (Remove and Replace)
Warning: If the vehicle has air suspension, activate "Jack" mode on the touchscreen before raising and supporting the vehicle.
Removal
- Remove road wheel (refer to procedure)
- Remove nut and bolt securing link to suspension knuckle (torque 130 Nm).
- Remove nut and bolt securing link to lower control arm (torque
130 Nm).
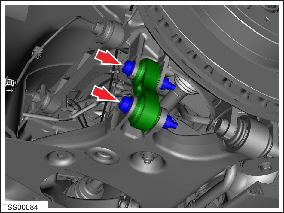
- Remove integral link.
- Installation procedure is the reverse of removal, except for the following: Note: Clean the affected areas before installation. Caution: Replace all nylon-insert locknuts. Caution: Only fully tighten suspension nuts and bolts when the vehicle is on a 4-post lift and the suspension is in the ride height position.
- Transfer vehicle to a 4 post lift (refer to procedure)
- Perform a four wheel alignment check (refer to procedure)
READ NEXT:
 Air Spring Module - Front - LH (Remove and Replace)
Warning: If the vehicle has air suspension, activate "Jack"
mode on the touchscreen before raising and supporting the vehicle.
Removal
Raise and support the vehicle (refer to procedu
Air Spring Module - Rear - LH (Remove and Replace)
Warning: If the vehicle has air suspension, activate "Jack"
mode on the touchscreen before raising and supporting the vehicle.
Removal
Raise and support the vehicle (refer to procedu
Air Suspension - Pressurize/Depressurize - One Air Spring
Depressurize
Connect a laptop with Toolbox to the vehicle.
Press the brake pedal to turn on the drive rails.
Leave the driver's door open to keep the drive rails on.
In Toolbox, sele
SEE MORE:
Pull onto the Flatbed Truck From
Front (Without Tow Eye)
CAUTION: To avoid damage, only pull the vehicle
onto a flatbed truck using a properly-installed tow
eye. Using the chassis, frame, or suspension
components to pull the vehicle can result in
damage.
WARNING: If the vehicle is pulled onto the flatbed
truck using this method, all suspensi
Seat Belt Assembly - 1st Row - LH (Remove and Replace)
Warning: If the 12V power supply is disconnected, do
not attempt to open any doors with door glass in closed
position. Failure to follow this instruction could result in
door glass shatter.
Note: Before disconnecting the 12V power supply,
ensure that the driver's door window
© 2019-2026 Copyright www.tesms.org
