Tesla Model S: LF Antenna - Bumper Carrier (Remove and Replace)
Tesla Model S (2012-2026) Service Manual / Electrical / LF Antenna - Bumper Carrier (Remove and Replace)
Removal
- Remove the underhood storage unit (refer to procedure)
- Disconnect the LF antenna harness connector.
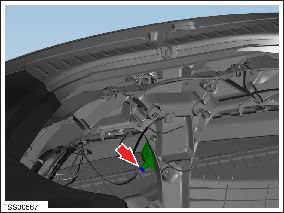
- Working through the opening in the bumper carrier, remove the
screws (x2) that secure the LF antenna (torque 3 Nm).
Note: Components have been removed in this graphic to aid clarity.
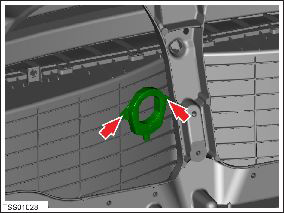
- Remove the LF antenna from the vehicle.
Installation procedure is the reverse of removal.
READ NEXT:
 LF Antenna - RH - A Post (Remove and Replace)
Warning: If the vehicle has air suspension, activate "Jack"
mode on the touchscreen before raising and supporting the vehicle.
Removal
Raise and support the vehicle (refer to pro
LF Antenna - Dash - Front - LH (Remove and Replace)
Removal
Remove the instrument panel side cover assembly (refer to
procedure).
Remove the screws (x2) that secure the antenna to the side cover
(torque 1 Nm).
LF Antenna - Center - Heelboard (Remove and Replace)
Removal
Depress button and fold 60% part of seat back forward.
Lift sufficient heelboard floor covering for access to LF
SEE MORE:
Charging adapter has electric arc flash hazard
Use different charging equipment
Charging is unavailable because your vehicle has detected an electric arc
flash hazard in the third-party charging
adapter used to connect a Combined Charging System (CCS) charge handle to your
vehicle's charge port.
An electric arc flash can occur if you attempt
Reporting Safety Defects
Contacting Tesla
For detailed information about your Model S, go to
http://www.tesla.com and log on to your Tesla account
or sign up to get an account.
If you have any questions or concerns about your
Model S, in the United States, Canada or Puerto Rico,
call 1-877-79TESLA (1-877‑798-3752) an
© 2019-2026 Copyright www.tesms.org
