Tesla Model S: Latch - Hood - Primary (RWD) (Remove and Replace)
Tesla Model S (2012-2026) Service Manual / Closures / Latch - Hood - Primary (RWD) (Remove and Replace)
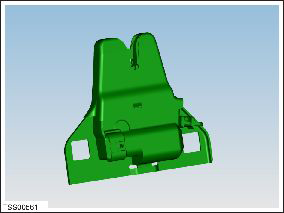
Removal
- Remove the hood latch cover (refer to procedure).
- Remove the nuts (x2) that secure the latch assembly to the crossmember (torque 16 Nm).
- Release the latch assembly from the studs, then lower and disconnect the harness connector.
- Disconnect the hood release cable from the latch.
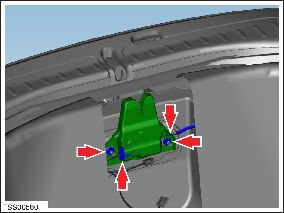
- Remove the primary latch assembly from the vehicle.
Installation procedure is the reverse of removal.
READ NEXT:
 Latch - Hood - Secondary (RWD) (Remove and Replace)
Removal
Remove the front underhood apron (refer to procedure).
Remove the bolts (x2) that secure the secondary latch to the
crossmember (torque 10 Nm).
Cauti
Latch - Hood (Dual Motor) (Remove and Replace)
Removal
Remove the front underhood apron (refer to procedure).
Remove the front fascia applique (refer to procedure).
Disconnect the harness from the LH side of the latch.
Acoustic Panel - Hood (Remove and Replace)
Removal
Open the hood for access.
Carefully release the clips (x14) that secure the hoodliner to
the hood.
Warning: To avoid personal injury, eye protection
must be
SEE MORE:
Charging Status
Charging status displays on the instrument panel when the charge port door is
open.
Time remaining: The estimated time remaining to charge to your set
limit.
NOTE: When charging to 100%, the vehicle may continue to charge with
low power when charging is displayed as
complete. This is ex
About the High Voltage Battery
Model S has one of the most sophisticated battery
systems in the world. The most important way to
preserve the high voltage Battery is to LEAVE YOUR
VEHICLE PLUGGED IN when you are not using it. This is
particularly important if you are not planning to drive
Model S for several weeks.
NOTE: Whe
© 2019-2026 Copyright www.tesms.org
