Tesla Model S: Latch - Hood (Dual Motor) (Remove and Replace)
Tesla Model S (2012-2026) Service Manual / Closures / Latch - Hood (Dual Motor) (Remove and Replace)
Removal
- Remove the front underhood apron (refer to procedure).
- Remove the front fascia applique (refer to procedure).
- Disconnect the harness from the LH side of the latch.

- Remove the bolts (x2) that secure the latch to the crossmember
(torque 10 Nm).
Note: Image shown with harness connected.
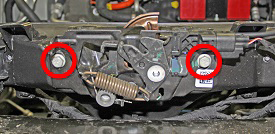
- Carefully lift the latch assembly and disconnect the hood latch cables (x2).
- Remove the latch assembly from the vehicle.
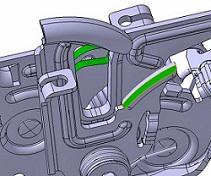
Installation procedure is the reverse of removal, except for the following:
- Apply approximately 0.1 grams of RheoGel TEK676 grease
to both of the areas shown.
Front latch Rear latch 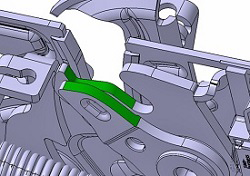
READ NEXT:
 Acoustic Panel - Hood (Remove and Replace)
Removal
Open the hood for access.
Carefully release the clips (x14) that secure the hoodliner to
the hood.
Warning: To avoid personal injury, eye protection
must be
Power Strut - Liftgate (Remove and Replace)
Removal
Open the liftgate.
Support the liftgate in the open position.
Remove the RH C-post upper trim (refer to procedure).
Release the RH rear corner of the headlining from the b
Strut - Liftgate (Remove and Replace)
Removal
Open liftgate.
Support liftgate in open position.
Release clip securing gas strut to body.
Disconnect gas s
SEE MORE:
Mobile Connector control box temperature high
Maximum charge rate reduced
Charge current has been temporarily reduced because the Mobile Connector has
detected increased temperature
inside its control box housing.
Make sure the Mobile Connector is not covered by anything, and that there is no
heat source nearby. If the problem
persists in
Wheels and Tires
Tire Rotation
Periodic tire rotation increases the service life of tires. Tesla
recommends tire rotation at 6,250 mi (10,000 km) intervals.
Tire Rotation Patterns
The appropriate tire rotation pattern depends on the design of the
tire. Check the sidewall to see if there is an arrow showing
© 2019-2026 Copyright www.tesms.org
