Tesla Model S: Latch - Hood - Secondary (RWD) (Remove and Replace)
Tesla Model S (2012-2026) Service Manual / Closures / Latch - Hood - Secondary (RWD) (Remove and Replace)
Removal
- Remove the front underhood apron (refer to procedure).
- Remove the bolts (x2) that secure the secondary latch to the
crossmember (torque 10 Nm).
Caution: Care must be taken to avoid fasteners falling into
open cavity.
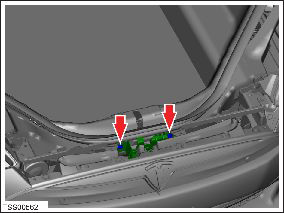
- Carefully release the secondary latch assembly and then rotate to access the harness connection. Caution: Take care not to damage component(s).
- Disconnect the harness from the latch.
Note: Components have been removed in this graphic
to aid clarity.
- Remove the latch assembly from the vehicle.
Installation procedure is the reverse of removal, except for the following:
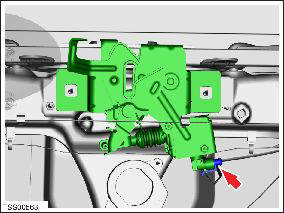
- Apply approximately 0.06 grams of RheoGel TEK676 grease to
the areas shown.
READ NEXT:
 Latch - Hood (Dual Motor) (Remove and Replace)
Removal
Remove the front underhood apron (refer to procedure).
Remove the front fascia applique (refer to procedure).
Disconnect the harness from the LH side of the latch.
Acoustic Panel - Hood (Remove and Replace)
Removal
Open the hood for access.
Carefully release the clips (x14) that secure the hoodliner to
the hood.
Warning: To avoid personal injury, eye protection
must be
Power Strut - Liftgate (Remove and Replace)
Removal
Open the liftgate.
Support the liftgate in the open position.
Remove the RH C-post upper trim (refer to procedure).
Release the RH rear corner of the headlining from the b
SEE MORE:
Assembly - Instrument Panel Lower - RH (Remove and Replace)
Removal
Remove the RH instrument panel side cover assembly (refer to
procedure).
Note: LH panel is illustrated; RH removal is
identical.
Using a suitable tool, release the clips (x13) that secure the
trim to the dash substrate.
Sensor - Ride Height - Front - LH (Remove and Replace)
Warning: If the vehicle has air suspension, activate "Jack"
mode on the touchscreen before raising and supporting the vehicle.
Removal
Position the vehicle on a lift, but do not raise the vehicle at
this time.
Loosen the front LH lug nuts (torque 175 Nm).
Remove the
© 2019-2026 Copyright www.tesms.org
