Tesla Model S: Latch - Liftgate (Remove and Replace)
Tesla Model S (2012-2026) Service Manual / Closures / Latch - Liftgate (Remove and Replace)
Removal
- Open liftgate and secure at working height.
- Remove liftgate trim (refer to procedure)
- Disconnect wiring harness connector.
- Remove screws (x2) securing liftgate latch assembly (torque 10
Nm).
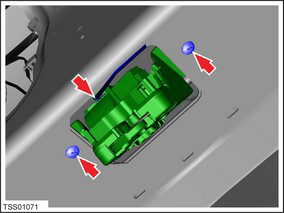
- Release outer cable from abutment and disconnect inner cable
from latch assembly.
- Remove latch assembly.
- Installation procedure is the reverse of removal, except for the following.
- Power the cinch motor until the correct alignment is reached. Open liftgate and torque tighten bolts.
READ NEXT:
 Striker - Liftgate (Remove and Replace)
Removal
Open liftgate.
Remove liftgate striker cover.
Remove bolts (x2) securing striker to body (torque 10 Nm).
Actuator - Cinching (Remove and Replace)
Removal
Open liftgate and secure at working height.
Remove liftgate trim (refer to procedure)
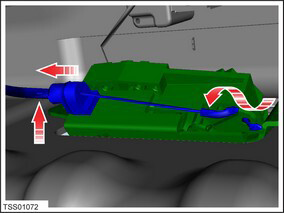
Remove screws x3 securing cinch motor to liftgate.
Release harness clip, rotate the c
Cable - Cinching (Remove and Replace)
Removal
Remove cinch actuator from liftgate (refer to procedure)
Disconnect cinch cable from latch assembly.
Remove cin
SEE MORE:
Software
Learn more about your Model S and the status of
software updates:
Get more information about your Model S such as the
VIN, vehicle name, and odometer. Touch Additional
vehicle information to display a list of the various
options your vehicle is equipped with.
View your current software ver
Link - Lower - Aft - LH (Remove and Replace)
Warning: If the vehicle has air suspension, activate "Jack"
mode on the touchscreen before raising and supporting the vehicle.
Removal
Loosen the front LH lug nuts.
Raise and support the vehicle (refer to procedure)
Warning: Do not work on an incorrect
© 2019-2026 Copyright www.tesms.org
