Tesla Model S: Striker - Liftgate (Remove and Replace)
Tesla Model S (2012-2026) Service Manual / Closures / Striker - Liftgate (Remove and Replace)
Removal
- Open liftgate.
- Remove liftgate striker cover.
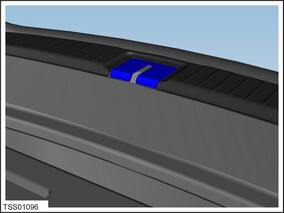
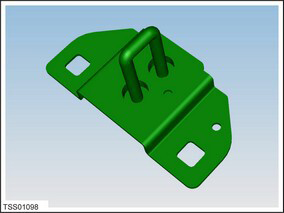
- Remove bolts (x2) securing striker to body (torque 10 Nm).

- Remove striker from vehicle.
- Installation procedure is the reverse of removal, except for the following:
- Check and adjust liftgate striker.
- Cycle the cinch motor several times to optimise striker position, open liftgate assembly and torque tighten bolts.
READ NEXT:
 Actuator - Cinching (Remove and Replace)
Removal
Open liftgate and secure at working height.
Remove liftgate trim (refer to procedure)
Remove screws x3 securing cinch motor to liftgate.
Release harness clip, rotate the c
Cable - Cinching (Remove and Replace)
Removal
Remove cinch actuator from liftgate (refer to procedure)
Disconnect cinch cable from latch assembly.
Remove cin
Exterior Release Switch - Liftgate (Remove and Replace)
Removal
Open the liftgate to a suitable working height.
Remove the applique from the liftgate (refer to procedure).
Caution: Take care not to damage component(s)
SEE MORE:
Battery - Auxiliary - 12V (RHD) (Remove and Replace)
Warning: If the 12V power supply is disconnected, do
not attempt to open any doors with door glass in closed position.
Failure to follow this instruction could result in door glass
shatter.
Note: Before disconnecting the 12V power supply,
ensure that the driver's door window
Driving in Low Temperatures
Tire performance is reduced in low ambient
temperatures, resulting in reduced grip and an increased
susceptibility to damage from impacts. Performance
tires (summer applications) have reduced traction in
ambient temperatures below 40º F (5º C), and are not
recommended in snow/ice conditions.
© 2019-2026 Copyright www.tesms.org
