Tesla Model S: Cable - Cinching (Remove and Replace)
Tesla Model S (2012-2026) Service Manual / Closures / Cable - Cinching (Remove and Replace)
Removal
- Remove cinch actuator from liftgate (refer to procedure)
- Disconnect cinch cable from latch assembly.
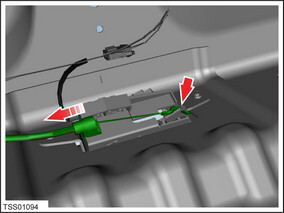
- Remove cinch cable from liftgate.

Installation procedure is the reverse of removal.
READ NEXT:
 Exterior Release Switch - Liftgate (Remove and Replace)
Removal
Open the liftgate to a suitable working height.
Remove the applique from the liftgate (refer to procedure).
Caution: Take care not to damage component(s)
Door Assembly - Front - LH (Remove and Replace)
Removal
Position vehicle with clear access to door assembly.
Remove sill panel trim (refer to procedure)
Disconnect door harness connectors (x3) from dash wiring
harness.
Supp
Latch - Door - Front - LH (Remove and Replace)
Removal
Remove front door trim panel (refer to procedure)
Remove screws (x2) securing door latch assembly to reinforcement
(torque 10 Nm).
SEE MORE:
Map Display
Touch these icons to customize what the map displays:
Display/hide satellite imagery
(if equipped
with premium connectivity).
Display/hide traffic conditions
(if equipped
with premium connectivity). Green lines
indicate no traffic; orange lines indicate
light traffic; red lines indicate moder
Switch Pack - Driver's (Remove and Replace)
Removal
Remove driver's side door trim (refer to procedure)
Move acoustic pad aside to access door trim.
Caution: Take care not to damage component(s).
Remove screws (x4) securing switch pack assembly t
© 2019-2026 Copyright www.tesms.org
