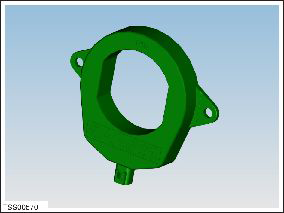
Tesla Model S: LF Antenna - Center - Rear (Remove and Replace)
Warning: If the vehicle has air suspension, activate "Jack" mode on the touchscreen before raising and supporting the vehicle. Removal
- Raise and support the vehicle (refer to procedure) Warning: Do not work on an incorrectly supported vehicle. Warning: To avoid personal injury, use appropriate equipment when performing this operation.
- Remove the rear diffuser (refer to procedure)
- Remove the screws (x2) that secure the LF antenna to the body
(torque 2 Nm).
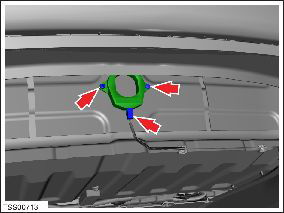
- Disconnect the harness connector and remove the LF antenna.
Installation procedure is the reverse of removal.
Note: Clean the affected areas before installation.
Column Switch - Wash/Wipe (Remove and Replace)
RemovalRemove steering controller module (refer to procedure)
Installation
Installation procedure is the reverse of removal.
Column Switch - Cruise Control (Remove and Replace)
RemovalRemove steering controller module (refer to procedure) Installation Installation procedure is the reverse of removal.
Column Switch - Tilt/Telescope (Remove and Replace)
RemovalRemove steering controller module (refer to procedure)
Installation
Installation procedure is the reverse of removal.
READ NEXT:
 Switch - Hazard Warning (Remove and Replace)
Removal
Remove touch screen surround trim (refer to procedure)
Release hazard warning switch from substrate and disconnect
harness connector from switch.
Remove switch.
Power Socket 12V - Center Console - Rear (Remove and Replace)
Removal
Power driver's seat fully forward for access.
Release clips (x10) securing driver's side upper center console
trim to substrate.
Switch Pack - Driver's (Remove and Replace)
Removal
Remove driver's side door trim (refer to procedure)
Move acoustic pad aside to access door trim.
Caution: Take care not to damage component(s).
SEE MORE:
Forward Junction Box - 2nd Generation - 40 Amp Fuse (RWD) (Remove and
Replace)
Warning: Only technicians who have been trained in High
Voltage Awareness are permitted to perform this procedure. Proper
personal protective equipment (PPE) and insulating HV gloves with a
minimum rating of class 00 (500V) must be worn any time a high
voltage cable is handled. Refer
Liftgate Glass (Install)
Installation
Use the adhesive scraper to remove the excess urethane from the
liftgate glass and body.
Temporarily reconnect the CHMSL to the harness in the center of
the liftgate and have an assistant depress the brake pedal. Ensure
that the CHMSL lights up properly. If any
