Tesla Model S: Module - Body Controller - BCM (Dual Motor) (RHD) (Remove and Replace)
Tesla Model S (2012-2026) Service Manual / Electrical / Module - Body Controller - BCM (Dual Motor) (RHD) (Remove and Replace)
Removal
- Move both front seats to their rearmost positions.
- Disconnect 12V power.
- Rear wheel drive (RWD): Refer to procedure.
- Dual Motor: Refer to procedure.
- Release the active suspension ECU module and move it out of the working area (refer to procedure).
- Remove the RH footwell cover (refer to procedure).
- Release the trim clips (x3) that secure the driver's footrest to the footrest dead pedal. Remove the driver's footrest.
- Carefully peel back the front RH carpet for access. Caution: Take care not to damage component(s).
- Remove the nuts (x2) that secure the driver's footrest dead pedal. Remove the driver's footrest dead pedal.
- Release the barrel clips that secure the Body Control Module (BCM) harness to the bulkhead.
- Release the edge clip that secures the BCM harness to the LH side of the bracket.
- Remove the screws (x2) that secure the BCM bracket to the bulkhead. Gently pry the BCM bracket away from the bulkhead.
- Disconnect the harness connectors (x8) from the BCM.
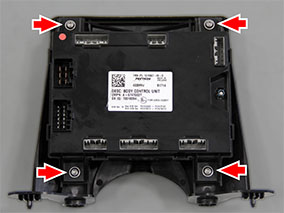
- Remove the bolts (x4) that secure the BCM to the BCM bracket.

- Remove the BCM from the vehicle without the bracket.
Installation procedure is the reverse of removal, except for the following:
- Use Toolbox to update or redeploy the firmware:
Note:
- If the vehicle is not running the latest firmware, run the "Vehicle Firmware Update" procedure.
- If the vehicle is running the latest firmware, run the "Firmware Redeploy" procedure.
- In the Toolbox "Pektron Body Controls Configuration" panel, select "Body Controller" and press the Play button.
- Relearn all keys (refer to procedure).
- Use Toolbox to reset the immobilizer.
READ NEXT:
 Module - Steering Column Control (Remove and Replace)
Removal
Ensure that the front road wheels are in the straight ahead
position.
Fully extend the column and centralize tilt.
Remove the steering wheel (refer to procedure).
Care
 Module - Thermal Controller (Remove and Replace)
Removal
Remove IP carrier (refer to procedure)
Remove screws (x4) securing thermal control module to HVAC unit.
Position module for access and disconnect wiring harness
connec
 Module - HVAC Controller - RCCM (Remove and Replace)
Removal
Remove the IP carrier (refer to procedure).
Disconnect the HVAC harness connector from the Remote Climate
Control Module (RCCM).
Remove the screws (x4) that secure the RCC
SEE MORE:
 Shaft - Steering Column - Intermediate Upper (Remove and Replace)
Removal
Remove the driver's side footwell cover (refer to procedure).
Disconnect the lower intermediate shaft (refer to procedure).
Disconnect the lower intermediate shaft from the slot in the
upper intermediate shaft.
Release the upper intermediate shaft from the co
 Four Wheel Alignment - Check and Adjust
Note: This procedure is not specific to a particular alignment
machine. Follow the alignment equipment manufacturer's instructions for
additional information and safety instructions.
Special tool(s) required for this procedure:
Supplier
Part Number
© 2019-2026 Copyright www.tesms.org

