Tesla Model S: Knuckle - Suspension - Rear - LH (Remove and Replace)
Tesla Model S (2012-2026) Service Manual / Suspension / Knuckle - Suspension - Rear - LH (Remove and Replace)
Removal
- Remove rear brake dust shield (refer to procedure)
- Remove nut and bolt securing toe link arm to knuckle (torque 130 Nm).
- Remove nut and bolt securing integral link to knuckle (torque 130 Nm).
- Remove nut and bolt securing lower control arm to knuckle (torque 190 Nm).
- Remove bolt securing upper suspension link to knuckle (torque 140 Nm).
- Remove nut and bolt securing air spring module to knuckle
(torque 140 Nm).
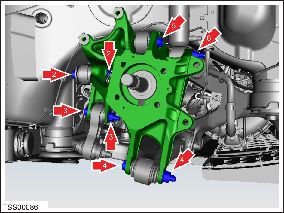
- Remove suspension knuckle.
Installation procedure is the reverse of removal, except for the following:
Caution: Ensure that the bolt that secures the spring assembly to the knuckle is inserted towards the rear of the vehicle; the head of the bolt faces the front of the vehicle and the nut is tightened at the rear.
Caution: Only fully tighten suspension nuts and bolts when the vehicle is on a 4-post lift and the suspension is in the ride height position.
Transfer vehicle to a 4 post lift and perform a 4 wheel alignment check (refer to procedure).
READ NEXT:
 Hub - Rear - LH (Remove and Replace)
Special tool(s) required for this procedure:
Supplier
Part Number
Description
Tesla
1062500-00-A
Magnetic F
Control Arm Assembly - Rear - Lower - LH (Remove and Replace)
Warning: If the vehicle has air suspension, activate "Jack"
mode on the touchscreen before raising and supporting the vehicle.
Removal
Loosen the front LH lug nuts.
Raise and
Link - Suspension - Rear - Upper - LH (Remove and Replace)
Warning: If the vehicle has air suspension, activate "Jack"
mode on the touchscreen before raising and supporting the vehicle.
Removal
Remove the wheel (refer to procedure).
SEE MORE:
Factors Affecting Energy
Consumption
While driving:
Elevated driving speed.
Environmental conditions such as cold or hot weather
and wind.
Using climate controls to heat or cool the cabin.
Uphill travel: Driving uphill requires more energy and
depletes range at a faster rate. However, driving
downhill allows your vehicle to
I'm Feeling Lucky, Hungry
NOTE: "I'm Feeling Lucky" and "I'm Feeling Hungry" may
not be available in all market regions and on all vehicle
configurations.
In addition to navigating to a destination of your choice,
Model S can also suggest nearby locations based on
whether you are feeling Hungry or Lucky. In the
navigati
© 2019-2026 Copyright www.tesms.org
